


Showing posts with label recipes. Show all posts
Showing posts with label recipes. Show all posts
Friday, May 10, 2013


Wednesday, March 13, 2013
Honey and Rosemary Pickled Spring Onions
When I moved here, I was warned the owner of the property really liked onions. What I didn't seem to understand was how much this translated to random onion patches all over the property. Here is some either spring onions or baby leeks, I can't quite tell. Luckily my pickling recipe works for both!
1c honey
1c vinegar
1/2c water
1 tablespoon flaked salt
1 tablespoon black peppercorns
6 teeth garlic, peeled (rawwwwr)
1 lime, juiced (zested if you want tangy)
1 long sprig rosemary
1 big handful spring onions (this bunch was perfect for this amount).
Put all ingredient minus onions and rosemary in a non reactive pan. Some pans, like copper, can leech, well, copper into your preserves which not only make them toxic but makes them taste terrible! A good stainless steel pan with a heavy base solves this problem. Let simmer gently for ten minutes.
Heat rosemary in empty pan gently, until the room is fragrant with the smell of rosemary. Add to jars.
Meanwhile measure onions against your jars and trim about half an inch below the top. Some will be uneven but it won't matter. Stuff as many into each jar in one go (if you like it neat) as you can. If it goes over the top, press it down gently. It'll go down more later.
Allow liquid to cool slightly but allow to be still a little hot. Pour into jars slowly and wait for liquid to soak up, about 2 minutes. Tap jars down and fill again, pressing onions down again. This time they should bend easily and be softening nicely from the heat. Top off and seal, refrigerating immediately.
They're excellent after even a day but taste REALLY awesome after a week. I like to put them even on store bought pizza, who cares?! Eat out of the jar! Put in sour cream to make a delicious dip! Eat the heck out of it.
The photo of the jars is right side up in edit but sideways on blogger - what do you see?!

Monday, March 4, 2013
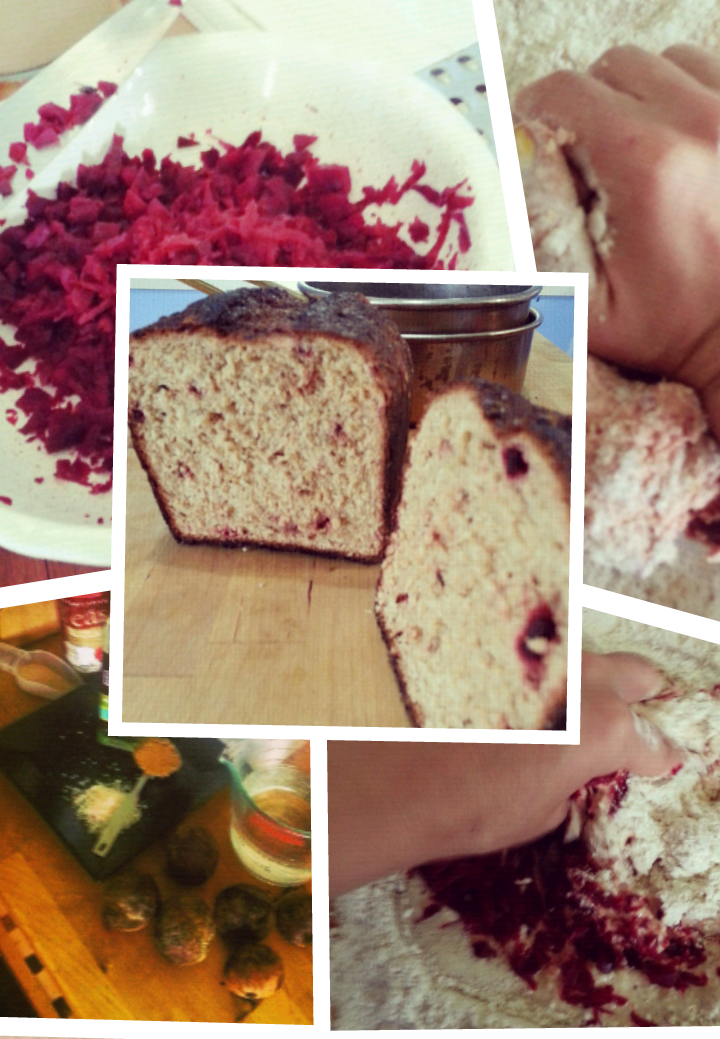
Chunky Breakfast Beetroot Loaf Bread
I've been moving and it's been hard on my poor vegetables! After the move I found some horrible wilted beetroot (beets for you Americans) looking sad in the back of the pantry. This is a good recipe for that. Simply steam the old sad beetroot until soft and trim all the wrinkly bits off. If you have chickens you can be quite vicious with what you take away. Shred it all until you have about a cup of beetroot. Since the end of a beetroot can't be sliced by my mandolin, I made chunks with the last bits with my knife. That way I got no waste. Otherwise if you don't want chunks, simply just use the shredded beetroot!
Combine 3/4c water and 7g or two and a quarter teaspoons dry yeast with one tablespoon sugar. This will help you figure if your yeast is any good. Do this before you chop your beetroot and by the time you're done it should be foaming.
Throw four cups of flour onto a work surface (if you have problems cleaning up a paint scraper from a hardware store is a wonderful thing) and make a well in the centre that has high sides.
Put the beetroot in the well with a good handful of salt, about 10g or two tablespoons of coarse kosher or river salt (I use pink river). Becuase bread is so light and has so much flavourless flour, it needs more salt than you think. This, however, will nearly always be less salt than a traditional purchased loaf contains.
Also add two tablespoons of oil.
Pour the foam water slowly as you stir with your fingers of the other hand. Push up the sides to make sure the water doesn't spill over the edge. If you work your way outwords, your loaf will not pick up more flour than it needs. If your beetroot is extra wet, you might need up to another cup. It should be slightly sticky so if it is just keep kneading. Eventually the texture of the dough will seem stretched, dull and springy. When it suddenly transforms into what looks and smells exactly like what you think it should (the bakery smell will start filling your house already!) you are done. It should take about ten minutes. If you have problems kneading, stand on a step stool or chair - the weight from above is more important the actual hand motions.
Put in oiled bowl and raise 45 minutes. Punch the double inflated dough (if it's not double, wait a little longer) down into the bowl and make a new ball of dough and let sit until doubled again.
Turn on the oven to as high as it goes. Prepare a glass of water. If you have a gas oven, put a lipped sheet pan on the base of your oven.
Punch down and form loaf. I like my loaf tins so I use those.
This is where you can choose your decor. Do you like the basic simplicity of a flour lined crust? Do you prefer a shiny flaky crust? A crisper crust is made by oiling the pan before putting your loaf in and then using an egg wash (bit of egg and water) over the top. A more rustic loaf can be made by putting flour down on the pan (a tiny amount of oil brushed up the sides first) and the top floured.
Let raise until double. When it's half rises, cut a big slice into the top. I like to do it early because I love the appearance of it. Otherwise do it later and you'll get those nice thin lines. Should be another half hour to rise.
Yes, three rises. This will nearly always guarantee a fluffy loaf if you knead properly and have a hot oven. Trust me and you will ALWAYS take that extra step because thw guarantee is WORTH it. Nothing worse than all that work and flour just to have a sad flat loaf.
Put the loaf in the oven and toss the water into the bottom. Make sure not to hit the pilot light or flame if you're on gas!
Immediately turn down to 180°c or 350°F. Let cook five minutes less than I did. See how I burnt the edges? Don't do that. I just moved!! This is proof though that oven times can differ depending on your oven. After half an hour, check on it and see if its nice and golden on the outside and springy to the touch (touch quickly!). You won't know 100% by eye until you're used to bread but otherwise when it appears as done as you want it (30-45) flip it upside down and flick it. If it sounds nice and hollow, you have bread!
Monday, November 14, 2011
Tomatoes and Strawberry Jam!
Hello Everyone!

This month has been super jam-packed busy! So busy in fact I had to take time off from real world working just to keep up with what's going on at home! And speaking of jam-packed, I even packed jam. Not just the mango rosemary jam I promised and never delivered but good ol' fashioned strawberry jam. I tested two recipes and came back with the one I liked the most! Oddly enough, that was not the country 'use lemons' recipe that you slow cook. The more delicious, thicker, pinker lovelier batch came from the back of the Jamsetta packet. Go figure! (If anybody can tell me where to get local pectin, please post!)
This is the CWA strawberry preserves. It was dark and honied almost, which was quite nice but didn't taste near as fresh as the regular pectin recipe, even though they were the same batch of strawberries. This also had a higher propensity to want to burn, one because it took 40 minutes to boil and two because you weren't allowed to stir it. Also, you used less lemons and got more preserves out of the packet jam. Ouch! If I had a lemon tree, I would totally do the CWA recipe way more and be a bit more careful about eyeing it perfectly to get it just right, but until I can afford 10 lemons a batch, I might stick to the packet. How unfortunate for me!
For quick jam:
3kg strawberries
1/2c water
8 tablespoons lemon juice (about two lemons)
2 50g packets Jamsetta
3kg sugar
3 tablespoons butter (optional)
Before starting, place some plates in the freezer.

Rinse and hull strawberries. Hulling means just to cut the tops off real quick with a knife. Feed tops to the chickens or compost for lovely vitamin-C rich soil (great for watering citrus!).
Place everything minus Jamsetta and sugar and put into a preserving pan.

Or, like I do *above* use a nice good baking tray on a long burner (or two burners) of your stove. Basically, you want as large a surface as possible to prevent clogage, difficult stirring and, oh, burning the whole darn thing. Cook until fruit is soft, about 10 minutes. Maybe 20. Depends on the size of your strawberries and how berry-y you want the jam. I chose really super soft, 20 minutes.
Add Jamsetta, sugar and butter, if using (it keeps the scum from forming). Bring to a boil for 10 minutes, removing any scum with a spoon. It should look like above.
Test by placing drop or three of jam onto frozen plate and waiting ten seconds. If it wrinkles and appears jam-like when poked questioningly with the tip of a finger, it's done.
Either wait to cool and store in jars with a wax ring on top or put hot into sterilized jars and boil can 10 minutes, depending on your preferred method.
 Also, my husband and I built a giant tomato patch over the weekend! For the last month, we've had tomatoes growing in a seedling bed and finally, they were getting too crowded for comfort. I filled the bed, but right before I did I snapped a photo of it! I know it looks so empty without seedlings right now but I assure you it's filled with 400 tomatoes, 5 varieties at the moment. All heirloom.
I'll be writing about how to grow nice tomatoes in the near future!!
Happy Cooking!


This month has been super jam-packed busy! So busy in fact I had to take time off from real world working just to keep up with what's going on at home! And speaking of jam-packed, I even packed jam. Not just the mango rosemary jam I promised and never delivered but good ol' fashioned strawberry jam. I tested two recipes and came back with the one I liked the most! Oddly enough, that was not the country 'use lemons' recipe that you slow cook. The more delicious, thicker, pinker lovelier batch came from the back of the Jamsetta packet. Go figure! (If anybody can tell me where to get local pectin, please post!)
 |
| Dark red strawerry preserves, yum! |
For quick jam:
3kg strawberries
1/2c water
8 tablespoons lemon juice (about two lemons)
2 50g packets Jamsetta
3kg sugar
3 tablespoons butter (optional)
Before starting, place some plates in the freezer.

Place everything minus Jamsetta and sugar and put into a preserving pan.

Or, like I do *above* use a nice good baking tray on a long burner (or two burners) of your stove. Basically, you want as large a surface as possible to prevent clogage, difficult stirring and, oh, burning the whole darn thing. Cook until fruit is soft, about 10 minutes. Maybe 20. Depends on the size of your strawberries and how berry-y you want the jam. I chose really super soft, 20 minutes.
Add Jamsetta, sugar and butter, if using (it keeps the scum from forming). Bring to a boil for 10 minutes, removing any scum with a spoon. It should look like above.
Test by placing drop or three of jam onto frozen plate and waiting ten seconds. If it wrinkles and appears jam-like when poked questioningly with the tip of a finger, it's done.
Either wait to cool and store in jars with a wax ring on top or put hot into sterilized jars and boil can 10 minutes, depending on your preferred method.
 Also, my husband and I built a giant tomato patch over the weekend! For the last month, we've had tomatoes growing in a seedling bed and finally, they were getting too crowded for comfort. I filled the bed, but right before I did I snapped a photo of it! I know it looks so empty without seedlings right now but I assure you it's filled with 400 tomatoes, 5 varieties at the moment. All heirloom.
I'll be writing about how to grow nice tomatoes in the near future!!
Happy Cooking!
Friday, October 28, 2011
Mango & Brazil Nut Bread
 It's summer in the beautiful land where I live! That means, glorious Queensland being what it is, mango season is heavily upon us and I am a glutton for a glut! I always get bored easily thus I never like to make too much of one thing for the home. I also always like to try new things - especially if I can get a deal on them! That's when I thought, "Why not mango bread?" and I Googled and, yes, mango bread is a thing. I combined a few recipes and this is the delicious thing I came up with:
2 c. plain flour
2 tsp bicarb of soda
5 whole cloves
1/4 tsp fresh grated nutmeg
1/2 tsp salt
1 c. sugar
3 eggs
1/4 cup vegetable oil
3/4 cup melted butter
4c diced mango, separated into 2c batches
1/2c brazil nuts
Preheat oven to 180c.
Now I'm going to be naughty and tell you that I just chucked all the ingredients minus two cups of mango into the food processor and let it go until I could tell the brazil nuts were nice and finely chopped.
Butter or oil a loaf tin and fill with batter. Sprinkle remaining 2 cup mango on top and stir in with a spoon for two seconds.
Bake for 40 minutes or until risen and sandy yellow-brown all over.
I served this with mango rosemary jam, which I will provide a recipe for tomorrow! :)
Monday, July 25, 2011
I really hope I don't pack the chocolate before I need it.

Hello again, naked readers!
Sorry for the lack of updates and explanations of what's been going on around here lately, I have been moving - whilst simultaniously getting this blog updated for upcoming events and sales! We also have a new printout of business cards so be sure to pick some up at the Joel Salatin workshop on the 5th of August.
Don't worry, nothingbutanapron.com is staying right where it is, it's just the owners are moving. We will be renting a commercial kitchen until our new kitchen is approved, don't you worry.
I also got myself a job at the lovely and local Food Connect recently. A small job but I am hoping the connections and feel-good vibes at this place will really last a lifetime. For those that don't know, Food Connect is an awesome local-food-only CSA provider in the Brisbane area and one of my main contacts for last-minute produce.
For those of you that don't know, I get my produce direct from farmer at a fair price - sourcing all my produce by hand. Food Connect makes this slightly easier by having a larger variety and more sources on hand than I do and selling to me when I run short. They also provide me with my weekly CSA box, which I absolutely adore for my style of eating.
When eating from a CSA you can't always (aka never) pick what you get unless you get extras. This makes your first venture into CSA from a 'normal' diet quite difficult. Not only do you find odd pieces of food you don't know what to do with (kohlrabi seems to be the fun one - that, and yakons) but you also have to suddenly learn how to work with what you have. Gone are the days of buying at the shops what you need per meal - instead you have to work out how to change virtually every recipe to adapt to what's in the fridge so it doesn't go off. For beginners, this can be quite difficult.
When I first started this venture, I used Epicurious for my needs. I love love love cooking gourmet (NO SHIT SHERLOCK, for my next trick I'm going to invent the broom) so Epicurious was a *perfect* match for my style. It also has a nifty habit of being searchable by ingredient, food type (seeing as I'm kosher and all that) and meal type. I find, for beginner CSA-ers, this is an excellent choice to start. Especially if you really want to expand your cooking horizon.
Once you start becoming more familiar with ingredients and your own personal style (I was once referred to as 'country gourmet') then you can really begin to have fun with the CSA and, in turn, save a lot of money. Once you get in the habit, CSA becomes more of a really tasty lifestyle than a chore (which, admittedly, it can start out as).
Some useful tips for first-time CSA-ers:
Replace things in recipes with what you have on hand. This does not mean spinach is a perfect replacement for potatoes, but it does mean you can waver on *perfect matching* a recipe and actually have something that's more personal to your tastes. You might not even know what you personal tastes are yet as you try new things! A few things: onions can replace onions. SHOCKING, I know - but you can use any onion to replace any onion. Instead of going by cooking time, go by appearance (as, say, shallots will caramelize quicker) and remember flavour will change slightly (but, honestly, it may improve your meal as opposed to destroying it as some seem to think).
Replacements for potato can be sweet potato, jerusalem artichoke, even kohlrabi root, once peeled, taste good in potato-esque dishes. I find eggplant and zucchini almost perfectly replaceable by weight, minus the differences in flavour. Both taste excellent. Both can be pretty much in the same exact dishes, from noodle-less lasagne, to fried and even to baked. If grating, zucchini has slightly more water so do account for that (or simply squeeze it out).
When in doubt, stir-fries are excellent things. You can use just about anything and in general, all you have to do is throw the tough stuff in first, let it soften and then add the soft stuff. Pumpkin (which is also a good potato replacement), zucchini, eggplant, corn, cabbage - chuck it all in the wok with a tablespoon of water (maybe sesame oil) and some grated ginger, garlic and a touch of soy sauce (or what you like), serve with rice and suddenly you have an extremely healthy meal that uses up all those random veggies. It also helps you learn cooking times and delicious food combinations. Plus, you can pretty much never fail. I like to throw cooked udon noodles into mine at the very end with sesame seeds for a nice crunchy noodle-box type meal.
Use seeds and nuts. It's amazing how dishes transform into gourmet spectacles when you use a seed or nut. Pumpkin tastes surprisingly good with pumpkin. Pepita is the name for a usually roasted pumpkin seed. It has to be the only Mexican Spanish word we use in Australia. Ever. Minus jalepeno, which no Aussie can correctly pronounce. (But it's okay, I still can't figure out the proper pronounciation of have in this country - does it have an h in it or not?!) Sesame with Asian dishes, linseed with veggies or ground in fruit smoothies, pecan and walnuts with sweets, and almond goes on just about anything, provided it's flaked. Why it tastes different chopped than whole, I don't know, but it does.
Bake. Everything. I'm not kidding. If it's new, bake it. Unless it's a lettuce, then don't do that. Grill lettuce! Not actually joking here, grilled lettuce is delicious. Almost everything reveals it's true (delicious) flavour when baked or roasted (which is about 40 degrees higher than baking). This can give you a real feel for the flavours of your food, plus it almost never tastes bad.
When you have leftovers, figure out what you're going to do with them. This is key to a good relationship with your CSA box. Whether you intend on compost, preserving or chook food; you really need to figure out what to do with what you don't eat or you're going to disappoint yourself with your waste (which will gradually wane as you become familiar with CSA eating).
At first you will waste slightly more than you used to because you will go out and buy more to fit in with what you have. You needn't do this. If you work with what you have instead of buying more (I conceed to things like meat, lentiles, legumes, beans, bread, etc) you will slowly reduce your waste to nearly nothing. For preserving, remember you will most likely be working with small amounts so jarring is not practical. However, there are neat things like preserving in oil, which requires little prep and can be added to as you get more - as with mushrooms. If you have a container of preserved mushrooms, you simply add more mushrooms and flavourings to your desires and then fill over the top with more oil. Lemons can be preserved with salt. Eggplant and zucchini can both be grated on a mandolin and dried for an almost chip-like snack that'll keep a week or two in the pantry. Admittedly, I've eaten some after a few months back there. They were delicious. Making ice cream is also an excellent way to preserve food and, bonus, you have an excuse to make and eat ice cream.
You can also make veggie stock out of just about any veggie. The basics are carrot, onion and celery and even those are replacable. I've made delicious stocks out of eggplant, kale and corn cobs before. You really can use anything. So it's not 'proper stock' or whatever the chefs will tell you - it's still delicious, salt free, and works. Pop it on the stove, covered with water, boil twenty minutes, allow to cool and then strain. Use the soggy leftovers for chickens (except the obvious, like corn cobs and onion skins) or compost (except the obvious like corn cobs and onion skins).
Bread. Corn bread. Zucchini Bread. Pumpkin Bread. Bread with peppers and bits of corn in it. Bread with cheese and onions. Potato bread. Bread has the added bonus of being freezable as well.
Avocado and banana can both replace egg in cakes and breads. 1/2 avocado or 1 whole medium banana per egg. Both taste excellent with chocolate and here at Nothing But An Apron chocolate is a food group (and so is butter), so eat plenty!
This is just a couple basics to help you on your way; I will probably do a more in-depth report on CSA eating to reduce wasting and expense and increase health, but not right now... I've already shirked packing for long enough.
See you on the other side of the fence!
Friday, July 15, 2011
How to Create Sourdough Starter

Let's lay this shit out like it is. Sourdough starter is so simple yet the directions for it are so incredibly long, complicated and confusing on the internet and/or in books that you don't even want to bother! So here's what you need:
Flour
Water
Nothing But An Apron
DAY ONE - DO THIS NOW
Using a clean jar, fill with 50g water and 50g flour. Stir. Cover.
DAY TWO - DO THIS TOMORROW
Add 50g water and 50g flour. Stir. Cover.
DAY THREE - DO THIS THE NEXT DAY
Add 100g water and 100g flour. Stir. Cover.
DAY FOUR - YOU GET THE IDEA
Add 200g water and 200g flour. Stir. Cover.
DAY FIVE - LET'S CHANGE WHAT WE'RE DOING
Discard all but 200g of your starter. You can use this to make pancakes if you want, but it will be weak.
Every day after this for another three weeks, take away half the starter (100g) and add back the same amount in new feed (50g water, 50g flour). Whatever you take away, you can use!
If you want to keep it longer after the initial 3 weeks (by which time it should be insanely bubbly and gobble up your food) put it in the fridge and take out the night before you wish to use it and give it a feed then. You'll only need to feed it once every week or two when it's in the fridge this way. You can also dehydrate it as a dried yeast.
Troubleshooting:
If you get a layer of water on the top, put it in a warmer place and add a tablespoon of flour, mixed well.
If the starter fails to start, retry with a two inch long piece of rhubarb in the jar with the original mixture and throw out on Day 2. Yeast feeds on acids so that'll kickstart the process.
You can start cooking with it by day 5 when you throw out the large batch, but it won't be the texture you're familiar with. The quality will be slightly lesser than an older yeast. Don't expect miracle bread at this time but do expect a nice bread anyway. Even a poor beginner starter is nicer than most commercial ones. I recommend using the first starters for pancakes and waffles, so you're not relying on the natural yeast as much.
If it smells sour, it's still good, you just really shouldn't use that batch in baking. Compost it. A refeed should clear that smell.

Monday, July 4, 2011
A rant about citrus. And recipes!
I am driven by productivity. I can't call it a day unless I can say I was productive. I think it's all that Jewish guilt I didn't get as a child finally catching up with me.
I will moan to my husband, who is covered in grease and G-d-knows-what-else, "I am so upset! I did nothing today. Like, I did 2 loads of laundry, baked three cakes, reorganized the pantry and paid all the bills but that was LIKE IT. Other than that, I sat on my ass." And he's not really sure what to say. I'm sure he wants to yell at me and say, "You moron! I am covered in diesel fuel because I worked all day on my feet and didn't even get a lunch and you complain because you DID NOTHING?! I want to smack you!" Instead he says, "Aww, it's okay honey. You always do a lot. You can do more tomorrow." Which is just weird. But exactly what I need. Which is why we're married, probably.
So today I find myself with just an ever-so-slight surplus of citrus.
 I have no concept of restraint.
Do you know what you can do with citrus? Well. NOT FUCKING MUCH. There, I fricken said it. Why are there not more posts on "TEH INTARNET" about this? I see, over and over again, some poor sad soul bemoaning their lemon, lime and/or orange tree asking for recommendations of what to do with their glut and the replies they get are from people who clearly have no idea what a 'glut' is or just how many G-DDAMN FRUIT a tree produces. Let me put it in perspective. Each tree will produce about a thousand fruit in one season. People tend to have about THREE OR FOUR trees if they have one. This box of fruit? This PILE of fruit? Is not even 1/10th of what was currently ripe on one tree.
So when people ask for recipes and someone replies with, "Why don't you put one in a chicken!?" You just kinda wanna smack them. One, you probably already thought of that and two, what the ever loving crap do you do with the other 4000 fricken lemons you have? Make 4000 roast chickens?
Marmalade, you say? Marmalade? Okay... about 5 lemons produce a jar of marmalade. How much marmalade do you eat? Suckiest thing for me is I dislike marmalade. I don't like that I dislike marmalade because citrus season is just so. damned. productive. I wish I loved marmalade. I wish I could eat it out of the jar with a spoon. But the truth is - I just end up with 40 jars of marmalade leftover every year I sell in the markets or to greedy friends. And I feel weird (very weird) selling something I don't even like. Everyone seems to love it, at least. But it's a dirty secret of mine, "Here, buy this jar of stuff I don't eat! People say it's delicious!"
This is why I love Indian people. Hello there, random logic jump. Come with me. There are these amazing things like this amazing lemon pickle from Indian Food Rocks (and they have lime too!). I found an enlarged version of the recipe that asks for forty lemons. Forty! Now that's what I'm talking about, people. Plus - it's a fun rare treat that can be spicy, sour, salty and just plain amazing. And I love me some spicy food. And Indian people. You see where I went with that?
This recipe only asks for 4 oranges but it also only makes 6 cups of orange (which includes the liquid which you probably aren't skulling like an alcoholic). Bloody delicious, if you ask me. Like winter in a jar. But you can eat it in summer! I would make a quadruple batch of this if I were you so you can tuck it away until summer when you really want an orange and, like me, don't buy out of season from the markets.
See, the main problem I have with citrus-y recommendations is they are so boring. Orange cake. Done it. Marmalade. We discussed this. Eat one whole. Not even remotely helpful, people. The other problem is the rest of the recipes, like candied peels, are a fricken nightmare when you're doing it to 400 fruit. 5-10 is easy enough. Peel. Peel. Peel. But after about 7 or 8, your hands start to wrinkle and then, after about 15, you're pretty sure you've managed to pickle your fingerprints. Wear gloves, you say? Well, you wear gloves while peeling oranges with a tiny filet knife. See how exact you are. Yeah, I thought so. But hey, at least I can commit crimes and not get caught now, which'll totally help my business.
Then, there is this holy grail of "I can't believe how delicious this is and yet, how random it is we don't make it in the Western World because we're too afraid to try new things." Fifty lemons, people. FIFTY. Now that's a recipe. Oh yeah, and this shiz is fricken delicious.
And there's the classic preserved lemons. Anybody with a lemon tree should know about this, as it's simple, delicious and uses a good amount of lemons (and limes, and oranges, to different effect).
And of course, just to be a dick about the whole thing, some recipes I want to try I can't even read.
So when my husband asks if I did anything, I will say no. Because I "Only made 200 lemons into 5 different varieties of spicy Indian pickles and preserved them for future use for the next millenia." and he will feel sorry for me.
I will moan to my husband, who is covered in grease and G-d-knows-what-else, "I am so upset! I did nothing today. Like, I did 2 loads of laundry, baked three cakes, reorganized the pantry and paid all the bills but that was LIKE IT. Other than that, I sat on my ass." And he's not really sure what to say. I'm sure he wants to yell at me and say, "You moron! I am covered in diesel fuel because I worked all day on my feet and didn't even get a lunch and you complain because you DID NOTHING?! I want to smack you!" Instead he says, "Aww, it's okay honey. You always do a lot. You can do more tomorrow." Which is just weird. But exactly what I need. Which is why we're married, probably.
So today I find myself with just an ever-so-slight surplus of citrus.
 I have no concept of restraint.
Do you know what you can do with citrus? Well. NOT FUCKING MUCH. There, I fricken said it. Why are there not more posts on "TEH INTARNET" about this? I see, over and over again, some poor sad soul bemoaning their lemon, lime and/or orange tree asking for recommendations of what to do with their glut and the replies they get are from people who clearly have no idea what a 'glut' is or just how many G-DDAMN FRUIT a tree produces. Let me put it in perspective. Each tree will produce about a thousand fruit in one season. People tend to have about THREE OR FOUR trees if they have one. This box of fruit? This PILE of fruit? Is not even 1/10th of what was currently ripe on one tree.
So when people ask for recipes and someone replies with, "Why don't you put one in a chicken!?" You just kinda wanna smack them. One, you probably already thought of that and two, what the ever loving crap do you do with the other 4000 fricken lemons you have? Make 4000 roast chickens?
Marmalade, you say? Marmalade? Okay... about 5 lemons produce a jar of marmalade. How much marmalade do you eat? Suckiest thing for me is I dislike marmalade. I don't like that I dislike marmalade because citrus season is just so. damned. productive. I wish I loved marmalade. I wish I could eat it out of the jar with a spoon. But the truth is - I just end up with 40 jars of marmalade leftover every year I sell in the markets or to greedy friends. And I feel weird (very weird) selling something I don't even like. Everyone seems to love it, at least. But it's a dirty secret of mine, "Here, buy this jar of stuff I don't eat! People say it's delicious!"
This is why I love Indian people. Hello there, random logic jump. Come with me. There are these amazing things like this amazing lemon pickle from Indian Food Rocks (and they have lime too!). I found an enlarged version of the recipe that asks for forty lemons. Forty! Now that's what I'm talking about, people. Plus - it's a fun rare treat that can be spicy, sour, salty and just plain amazing. And I love me some spicy food. And Indian people. You see where I went with that?
This recipe only asks for 4 oranges but it also only makes 6 cups of orange (which includes the liquid which you probably aren't skulling like an alcoholic). Bloody delicious, if you ask me. Like winter in a jar. But you can eat it in summer! I would make a quadruple batch of this if I were you so you can tuck it away until summer when you really want an orange and, like me, don't buy out of season from the markets.
See, the main problem I have with citrus-y recommendations is they are so boring. Orange cake. Done it. Marmalade. We discussed this. Eat one whole. Not even remotely helpful, people. The other problem is the rest of the recipes, like candied peels, are a fricken nightmare when you're doing it to 400 fruit. 5-10 is easy enough. Peel. Peel. Peel. But after about 7 or 8, your hands start to wrinkle and then, after about 15, you're pretty sure you've managed to pickle your fingerprints. Wear gloves, you say? Well, you wear gloves while peeling oranges with a tiny filet knife. See how exact you are. Yeah, I thought so. But hey, at least I can commit crimes and not get caught now, which'll totally help my business.
Then, there is this holy grail of "I can't believe how delicious this is and yet, how random it is we don't make it in the Western World because we're too afraid to try new things." Fifty lemons, people. FIFTY. Now that's a recipe. Oh yeah, and this shiz is fricken delicious.
And there's the classic preserved lemons. Anybody with a lemon tree should know about this, as it's simple, delicious and uses a good amount of lemons (and limes, and oranges, to different effect).
And of course, just to be a dick about the whole thing, some recipes I want to try I can't even read.
So when my husband asks if I did anything, I will say no. Because I "Only made 200 lemons into 5 different varieties of spicy Indian pickles and preserved them for future use for the next millenia." and he will feel sorry for me.
Saturday, April 30, 2011
Basic (but perfect) Cucumber Dill Pickles

When I was a little girl, I thought pickles were special. If I was a really really good girl, I got them added to my tuna and white bread sandwiches. I was never allowed to eat all the pickles (though I tried) so I always considered pickles a real treat. These pickles almost cost me nothing and they taste way better than any commercial pickles I've ever stolen in the dark.
This recipe is for the amount shown, just two jars. I find making them often as opposed to big batches (unless doing proper canning, this is the refrigerator method) makes for tastier pickles. Great to do with leftover garden cukes on a casual Saturday afternoon; ready just in time for a Sunday roast and even better the next week.
1 cup 5% acidic vinegar
2 cups water
3 1/2 tablespoons salt
2 cucumbers, room temperature.
2 dill fronds
4 garlic cloves
4 dried chillis
Sterilize jars by placing them in cold water and bringing to boil for five minutes. Place in low-heat oven to keep hot while preparing pickles.
Boil vinegar, water and salt on stovetop. Meanwhile, crush garlic and place with dill and chillis into bottom of sterilized jars. Chop cucumber into 1/2 widthwise then 8ths lengthwise, scraping out seeds as you go. It's okay to leave some in, as I really like the texture of them, but I find cucumbers a bit too seedy for pickles. There's specific pickling cucumbers, but I like this recipe because it's perfect for regular ones. I think pickling cucumbers taste best as both sweet pickles and bread and butter pickles to go with something like silverside and homemade mayonnaise. Something like this is best eaten straight or with incredibly unhealthy things.
Shove cucumbers into jars. Really stuff them in. Stuff them so hard it becomes an internet meme. Yeah, I said it. They will shrink when pickled. Don't worry, the jar can take it. I've seen it take bigger things. Badum.
When sugar has completely dissolved, pour into hot filled jars slowly, leaving 1/4 inch headspace at the top. Wipe the jar and lid down and close. Leave on counter to cool and the refrigerate. Will be ready in a day! Voila! Pickles! Just like the ones you ate as a kid, but with less funny crap in it.
Wednesday, April 27, 2011
Liz's Never Fail Super Fluffy Whole Wheat Loaf

This bread requires three rises, which I have tried to bypass without success - it needs the three rises to become super fluffy, so don't skip this bit. The bread is rather easy to make just time consuming on this part, however it is MORE than worth it, as it will be the fluffiest homemade loaf of wheat bread you can make. If you've ever tried to make wheat bread at home you will realize it's quite challenging to rise nice and fluffy since it is a thicker flour. This solves that problem.
- 2 cups warm water
- 2 1/2 teaspoons/14g active dry yeast or 28g fresh yeast mushed with a fork
- 1/4 cup golden syrup or honey (spray oil into measuring cup before filling so it slips out easily)
- 5-6 cups whole-wheat flour
- 2 tbs sugar
- 2 tsp salt
- 1/2 cup canola oil (I've used olive with success)
- 1 egg
Combine yeast and water and golden syrup into bowl. Allow to rest 10 minutes until foamy. If no foam appears, your yeast is dead and you need more. This is where I use my KitchenAid but combine the rest of the ingredients (minus the egg) into the water/yeast mixture. Knead until the dough springs back when touched - about 10 minutes by rough hand, 15 by gentle and 6 by Kitchen Aid.
Transfer dough to oiled and preferably warm bowl (I put my oven on at 60c and put the bowl in there as I mix everything, which helps the rise... or wash the bowl with super hot water just before using to keep warm). Cover with tea towel.
Rise 1 hour.
Punch dough and knead for 1 minute then put back into bowl for 45 minutes, covered with a tea towel.
Preheat oven to 180c fan forced, 200c regular, 400F regular, 440F fan forced. Fan forced preferable for nice crust. Grease two loaf pans, or two baking sheets and mould two loaves of bread. Cover with tea towels and let rise 45 further minutes.
Combine in small bowl egg with tablespoon water (milk if you prefer a harder crust) and slash top of bread with *very* sharp knife. Drag creates a more deflated loaf, so use your sharpest. Brush with egg mixture and sprinkle with your choice to topping - we prefer barley flakes, but some prefer oats, cornmeal (polenta in Australia), or anything you deem fit.
Bake 10 minutes.
Lower oven to 150c fan forced, 170c regular, 310F fan forced, 350F regular and bake 20-25 minutes more, or until desired colour is reached. Should be roughly as golden as a Brazilian woman's arse. Allow to cool, if you can.
Saturday, March 19, 2011
Chicken Liver Pâté

Much like Kimberly's schmaltz, Chicken Liver Pâté is an excellent classic Jewish dish. Even more so, you'll need the schmaltz for this recipe so it's a good thing we have it prepared! I have used, for a more personal touch, duck instead of chicken in this recipe.
250g chicken livers
1-2c chicken stock, preferably homemade
3 hardboiled eggs
1 red onion, chopped
3 tablespoons duck fat or schmaltz
Fresh flaked sea salt and fresh ground pepper
1. Slowly simmer the livers in enough chicken stock to just barely cover them - about 10 minutes. Drain. Reserve 2 tablespoons stock.
2. Using food processor, puree eggs and livers with stock as needed until smooth
3. Heat fat in pan until melted completely.
4. Gently caramelize onions over low heat for about 15 minutes or until just barely dark around the edges and golden in the middle.
5. Pour onions, fat and all into the livers and blend once more until a nice deep delicious paste.
6. Season to taste. I found it's best with a bit of salt and just a touch of pepper.
Eat like there's no tomorrow. Fantastic source of Vitamin A and protein!
Wednesday, May 12, 2010
Knishes Are Knice!
I’m writing this from the comfort of an Amtrak lounge car, riding the Coast Starlight from Portland to Los Angeles. It’s about a thirty-hour trip, and if you’ve ever ridden Amtrak, then you know the pleasures are many but do not include the food. I like to eat one meal in the lounge car just for the experience, but it’s too expensive to do that for every meal and I prefer some healthier snacks anyway.
So I packed a few tangerines, a bag of freshly-picked raw snap peas, some garlic cheese curds, and organic, naturally-sweetened raspberry lemonade. For something more substantial, I broke out an old recipe and made knishes.
In talking about it, I realized that not a lot of people outside of New York are familiar with knishes. I don’t know how my Southern ass found out about them – being Jewish was probably a factor – but I’m so glad I did. They’re delicious, portable, and oh-so-cheap! The recipe makes a ton of knishes, which is great because they freeze beautifully and go right from the freezer to the oven, toaster oven, or microwave. They’re also delicious at room temperature, making them ideal to take to work for lunches or to bring on long train trips.
I’m giving the recipe here for the knishes I made last night; you, however, are not married to this filling. Plain mashed potato filling is good, or you can add cheese, chicken, or any veggies. I’ve even offended the culinary sensibilities of three continents by making a sort of knish-bao hybrid, filling my knishes with teriyaki stir-fry. Knishes are a great way to use up leftovers.
Speaking of bao, I also like to prepare my knishes with that technique. Traditionally you roll up knish filling in the bread dough like a jellyroll, then cut it with the side of your hand and pinch it shut. For silly reasons, I like mine bao-style, like round stuffed buns, instead. So I’m giving you those instructions here.
And when you look and the recipe and think it’s too much oil and flour to be nutritious – remember, this makes A LOT. How many depends on the size of your knishes but I got almost three dozen out of this recipe. So don’t worry, you’re not eating it all at once!
Make sure you bring a couple extra if you take them to work; everyone wants one. I like to make a game out of it and say they can only have one if they correctly pronounce the word “knish.”

So I packed a few tangerines, a bag of freshly-picked raw snap peas, some garlic cheese curds, and organic, naturally-sweetened raspberry lemonade. For something more substantial, I broke out an old recipe and made knishes.
In talking about it, I realized that not a lot of people outside of New York are familiar with knishes. I don’t know how my Southern ass found out about them – being Jewish was probably a factor – but I’m so glad I did. They’re delicious, portable, and oh-so-cheap! The recipe makes a ton of knishes, which is great because they freeze beautifully and go right from the freezer to the oven, toaster oven, or microwave. They’re also delicious at room temperature, making them ideal to take to work for lunches or to bring on long train trips.
I’m giving the recipe here for the knishes I made last night; you, however, are not married to this filling. Plain mashed potato filling is good, or you can add cheese, chicken, or any veggies. I’ve even offended the culinary sensibilities of three continents by making a sort of knish-bao hybrid, filling my knishes with teriyaki stir-fry. Knishes are a great way to use up leftovers.
Speaking of bao, I also like to prepare my knishes with that technique. Traditionally you roll up knish filling in the bread dough like a jellyroll, then cut it with the side of your hand and pinch it shut. For silly reasons, I like mine bao-style, like round stuffed buns, instead. So I’m giving you those instructions here.
And when you look and the recipe and think it’s too much oil and flour to be nutritious – remember, this makes A LOT. How many depends on the size of your knishes but I got almost three dozen out of this recipe. So don’t worry, you’re not eating it all at once!
THE FANTASTICALLY PORTABLE FREEZABLE KNISH!
Dough:
2 cups unbleached white flour
2 cups whole wheat flour
1 cup barley flour *
1/2 Tbsp salt
1/4 tsp black pepper
1 Tbsp garlic powder (optional)
2 eggs
1/3 cup olive oil
1/3 cup veg or canola oil
1 1/4 cup water
Filling:
3 lbs potatoes, peeled and cubed
1 lb ground organic beef, chicken, or turkey
1 small onion, finely chopped
1 small turnip, finely chopped
1 carrot, finely chopped
1 cup spinach, finely chopped
2 eggs
Salt and pepper to taste
1 tsp paprika
1 tsp chipotle powder (optional)
Egg Wash:
1 egg + 1 Tbsp water, beaten together
* If you can’t find barley flour, just use 3 cups whole wheat and 2 cups white. But barley flour gives a very nice flavor if you can find it.
Preheat the oven to 375 F (200 C), and lightly oil a baking sheet.
For the filling, throw the potatoes in a pot and cover with water. Salt it if you’re in a hurry, and bring it to a good boil. Simmer the potatoes 10-20 minutes, until cooked.
Meanwhile, in a skillet, cook the ground meat and onion together. You don’t need to add oil; the meat will sweat its own fat out. When the meat and onion are cooked, drain in a strainer to get the excess grease out, then set aside.
The potatoes should still be cooking, so start on the dough. Mix the dry ingredients together in one bowl, and beat the wet ingredients in another bowl. Pour the wet into the dry and stir to combine until it’s all mixed in. Knead the dough until it’s even and moist but not sticky – add a little more flour if it stays sticky, or a little more water if it’s crumbly. (This is easier than it sounds, trust me.) You should be able to roll it into a ball and your finger should leave a lasting impression in the ball when you poke it, without dough sticking to your finger.
By now your potatoes should be about done. Drain them and return them to the pot with the heat off. Mash the potatoes well, then stir in the other ingredients until evenly blended.
Tearing off fist-sized chunks of dough, roll each chunk out one at a time until it’s about ¼-inch thick. Cut circles out with a cereal bowl or something similar. Hold a circle in your hand with the palm flat, and scoop a tablespoon or two of filling into the center. Gather the edges up carefully and give a little twist – it doesn’t have to be a perfect seal at the top, but you don’t want filling leaking out the sides. A bit peeking through at the top is just fine.
Keep rolling out the scraps with more dough and making more knishes until you’ve used all the dough. If you have a little filling left over, just eat it for a snack or give it to the chickens. Once all the knishes are ready, arranged nicely on the baking sheet (or sheets; you might need two), and brush them with that egg wash.
Stick the knishes in the oven and bake them for 30 minutes. Careful when they come out – the middle is REALLY hot; I burnt my lip on a fresh knish last night because they smelled so good I couldn’t wait. Let them cool for awhile and then bag ‘em up for the fridge or eat them right away.
If you plan to freeze the knishes, only bake them for 20 minutes and then give them another 20 minutes in the oven from the freezer.
Make sure you bring a couple extra if you take them to work; everyone wants one. I like to make a game out of it and say they can only have one if they correctly pronounce the word “knish.”
Tuesday, May 4, 2010
The Perfect Pie Crust (and it's gluten-free!)

I know a lot of people are cutting out gluten nowadays. I'm not on that bandwagon, but I'm always willing to try new things, and I had a hunch that gluten-free pie crust might be better than the traditional kind. I was right!
See, when you make pie crust, gluten is your enemy. The more you work the flour, the more you handle it and the more the butter melts into it, the more it glutenizes. That formation of gluten is what turns a pie crust tough and makes it turn out like bread or a cracker. All those little tricks people tell you, about keeping everything cold and handling it as little as possible and refrigerating it between every step and keeping your hands ice-cold but dry - that's all to prevent the formation of gluten. So why not just use gluten-free flours?
That's what I did, but I also kept my traditional pie-making tips. I'll give you the recipe I used, but you can also use these same techniques on a traditional pie crust recipe if you want to. They work!
THE BEST (AND EASIEST) GLUTEN-FREE PIE CRUST
1 3/4 cup brown rice flour
1/4 cup tapioca flour
1/4 cup arrowroot
1/2 tsp salt
2 Tbsp confectioners' sugar
1 tsp cinnamon, 1/2 tsp nutmeg, 1/4 tsp cloves (all optional)
3/4 cup butter, frozen
1 egg
1 Tbsp apple cider vinegar
5-6 Tbsp ice water
Mix the dry ingredients together thoroughly. Then grate the butter with a cheese grater, or cut it up into small cubes, and add it in. If you have a food processor, pulse it all together until it looks like coarse sand; if you don't, get in there with your fingers and crumble the butter in. (This can be very relaxing on a stressful day.)
Beat the egg and vinegar together, and pour into the flour-butter mix. Don't skip the cider vinegar, whatever recipe you're using! You can cut back on the water by 1 Tbsp so it balances out, but the cider vinegar is a big secret for perfect pie. Stir the liquid in slightly with a fork (or pulse in the processor) until it's mostly even, and then add the ice water just a tablespoon or two at a time, mixing (or pulsing) after each addition. Eventually it'll be a nice dough - not sticky, not springy. It'll be crumbly, but when you roll it into a ball it will hold its shape, like this:

So divide it into two parts, one slightly bigger than the other, and roll each into a ball.
At this point you would normally refrigerate the dough for awhile, giving it a chance to rest and dragging out the time it takes to make a pie by hours or a day. Fie, says I. Now you don't have to. You can roll it out right the heck now. Take it over to the table, unless you're really tall, because it's hard to get the right leverage for rolling out a crust on the countertop.
Some people say to roll out pie crust on wax paper. I don't do this or recommend it, because I always find that it tears up into little pieces, which get embedded in the pie, and it's a pain in the ass to remove them. So I like parchment paper, but when I don't have any on hand (like today), I use plastic wrap. Whichever you're using, spray a little water on the table and spread the paper/plastic over it - the water will hold it in place so it doesn't slide around when you roll it.
Drop the bigger of the two doughballs on top, cover it with another sheet of paper/plastic, and get to rolling. Change direction every so often so you get a nice big circle. You want it REALLY thin, so keep going until it's a huge thin circle. Peel off the top paper/plastic. Then put the pie plate on top of the crust, upside-down. Slide your hand underneath and flip the whole thing over carefully. Now smooth the crust over the inside of the pie plate, making sure that it's sitting nicely against the sides and bottom and hanging over the edges. Carefully peel off the paper/plastic, like so:

It might rip as you go. That's fine. Pinch it back together. No one's going to notice or care. The great thing about gluten-free pie crust is the fact that you can't overwork it!
Now repeat the process with that other doughball, which will be your top crust. When it's rolled out all nice and thin, put your filling in the bottom crust - in this case an apple-pie filling I made back in October and froze in a pie plate so that it would be the right size and shape to just plunk down in the crust without thawing.

Once the pie is filled, carefully lay the top crust over it and peel the bottom layer of paper/plastic off like you did before. Then seal the crust by crimping around the edges - hold your two index fingers horizontally, facing each other, and make a little V by pushing each one in. Once it's crimped, trim the excess off the edges, so it looks like this:

At this point I highly recommend brushing some beaten egg on top. It's not necessary, but it'll give you a nice golden crust with texture. And if you're adding a decoration (about which more in a minute), it'll help it stick.

Now for decor! You've got that big heap of trimmings right there, after all. I usually like to take some of those trimmings and make a little ornament to go on the crust. Since this is an apple pie, I made an apple. I've also made hearts, stars, and other easy-to-cut-out little shapes. If you're not inclined to do this, don't bother, it isn't necessary.
What you do need to do now is cut some vents. This can just be a couple of slits, it can be an X, or you can make a little star-type design with the vents like I did.

Another optional thing - I recommend sprinkling the whole pie with a bit of sugar here. It gives the crust a bit of texture, and an appealing, rustic look that kind of sparkles when the pie is done. You don't need much, just a teaspoon or so (I never measure it, I just grab some sugar in my fingers and give it a good dusting).
Now you're ready to bake. This is going to vary depending on your filling, but with a fruit pie I start out with the oven at 450 F. I bake it for 15 minutes, then lower the heat to 350 F and continue baking for another 45 minutes. That shock of hard heat at the beginning is what melts the butter and creates little air pockets which result in a nice flaky crust.
When the pie is done, let it cool, or the inside filling may be runny. It's most delicious while still just a bit warm though!

Heavenly.
Thursday, April 29, 2010
The Real Food Companion

You would think this book alone would be enough for me to write a raving review of it, but it's not the only reason I must spend this Wednesday trying to sell you something I love instead of writing a recipe or a whimsical domestic tip. It's not the only reason to purchase this book.
This book, in it's near four hundred pages, is probably the best cookbook for the money you could buy if you're into real homegrown homemade down to earth food. Basically, if you're a reader of this blog. With recipes for basic chicken stocks and classic Italian dishes from grandmother's memories, you will not be disappointed in the array for any diet in this book.
Not content with mere recipes, Matthew Evans discusses in great length the proper ways to kill animals, the proper ways to eat them and even the proper ways to grow them. If that weren't enough, he also talks about the best places within Australia and the world to get the ingredients for the most fabulous fresh dishes you can create.
If I haven't made Matthew Evans sound like a wonderful author and chef already, I must add this small thing he did that just blew me away. When I missed his arrival into my town this week I had been looking forward to, I emailed his website in distress. Expecting nothing or an employee-written reply, I was not prepared for a self-written email addressing all my questions with a friendly and welcoming demeanor. Yes, that's right, he wrote me back:
G'day Elizabeth,
so sorry to miss you in Brissie.
It was a very brief trip, as most are away from the farm. Animals are very unforgiving.
I am just finishing my book tour in South Australia this weekend, then spending quite a bit of time at home re-doing the pig paddocks and all that kind of outdoorsy stuff.
Love to sign your book, but it is probably only possible by mail at this stage. I could sell you one and send it, but since you already have the book it would cost twice in postage. A 3kg express post bag will cost a shade under $12 so you could mail it to me with an addressed envelope inside, though that does seem excessive. Happy to do it though. You could always plan a holiday to Tassie and come to our market stall....
I believe Avid are putting some footage on the web, somewhere, if you want to see what we talked about.
best Matthew
So not only is Matthew Evans a fair-trade fair-growing excellent master chef with a myriad of delicious recipes, he is also a down-to-earth sort of fellow you can't help but find yourself loving over and over again. If you buy any cookbook this year, I fully recommend purchasing The Real Food Companion.
So not only is Matthew Evans a fair-trade fair-growing excellent master chef with a myriad of delicious recipes, he is also a down-to-earth sort of fellow you can't help but find yourself loving over and over again. If you buy any cookbook this year, I fully recommend purchasing The Real Food Companion.
Tuesday, April 20, 2010
Meatless Monday: Eggy Barley Bread

We had a beautiful sunny weekend, but today looks like a chilly rainy day again, so lunch is vegetable barley soup and fresh-baked eggy barley bread. You don't get much more warm and cozy than that!
I'm a big fan of barley, which for some reason does not get the attention today that it did in the previous century. As a whole grain, it's got a chewy, hearty texture and wholesome flavor that is the perfect accompaniment to soup; you can also make risotto with it instead of rice. As a flour, it brings a lovely rich warm flavor and a creamy softness to breads.
This is a good recipe for the bread machine, if you have one. If you don't, you should get one! I don't often bake my breads in the machine, but I do when I'm busy and it still churns out hot, delicious, crusty fresh-baked bread with only five minutes of effort from me. It's cheaper than storebought bread, as well as fresher and more delicious. So get you a bread machine post haste, and then make...
EGGY BARLEY BREAD
1 cup water
1 egg
1 1/4 cups unbleached white flour
1 cup whole wheat flour
1 cup barley flour
1 1/2 Tbsp butter
1 1/2 tsp sugar
1 1/2 tsp salt
3/4 tsp yeast
Get the water in your measuring cup and then crack the egg in. Beat the egg and water together slightly, then pour into the bread machine. Sprinkle the flours over so that they float on top of the water. Cut up the butter into chunks and drop it into two corners of the machine, then add the sugar to another corner and the salt to another. Make a little well in the middle with your finger and pour the yeast into it. Switch the machine onto its basic setting and let 'er rip.
Come back when it's done, and transfer the loaf to a wire rack to cool. Make sure you cut a big slice for yourself (and anyone you like) and butter it while it's still hot. Have that slice with vegetable soup. Watch the rain fall as you eat and think about how much you love life.
Friday, April 16, 2010
It Works!!
I just have to give a big endorsement of Lizzie's recipe for baking soda shampoo. Sure, it's cheap and it's all-natural, but why not just use regular shampoo?
Aside from avoiding phthalates, it turns out there's an even better reason. This stuff cures dandruff better than any expensive high-tech dandruff shampoo on the market!
For some reason, most of the guys I know suffer from dandruff issues, and my husband's were getting bad. Head & Shoulders didn't fix it, and he only got moderate results from a very pricey bottle of KMS. He had to use the dandruff shampoo every single day to avoid that festive Christmas-flocking effect.
Then a few days ago, he ran out of shampoo and didn't have time to go out to buy more, so he whipped up some of the baking soda shampoo and vinegar conditioner from Lizzie's blog post. (See, men can read and enjoy our blog too!) Lo and behold, his hair is glossier, silkier, less oily, and there is not one hint of dandruff. We haven't seen any in days!
So, I'm a convert, and I hope y'all don't mind the double post. I just had to share these awesome results and encourage the world to give this a try. Don't you just love it when the best solution also turns out to be the cheapest one?
Aside from avoiding phthalates, it turns out there's an even better reason. This stuff cures dandruff better than any expensive high-tech dandruff shampoo on the market!
For some reason, most of the guys I know suffer from dandruff issues, and my husband's were getting bad. Head & Shoulders didn't fix it, and he only got moderate results from a very pricey bottle of KMS. He had to use the dandruff shampoo every single day to avoid that festive Christmas-flocking effect.
Then a few days ago, he ran out of shampoo and didn't have time to go out to buy more, so he whipped up some of the baking soda shampoo and vinegar conditioner from Lizzie's blog post. (See, men can read and enjoy our blog too!) Lo and behold, his hair is glossier, silkier, less oily, and there is not one hint of dandruff. We haven't seen any in days!
So, I'm a convert, and I hope y'all don't mind the double post. I just had to share these awesome results and encourage the world to give this a try. Don't you just love it when the best solution also turns out to be the cheapest one?
Friday, April 2, 2010
Pity the Fool!

What better day than April Fool's Day to make a nice and tasty fool?
This British dessert is a great way to showcase seasonal fruits. Usually, the fruit is pureed and then blended with whipped cream and egg whites to give it a fluffy, mousse-like texture. Occasionally the fool is then layered with cake or pastry to dress it up.
Jamie Oliver has a better version in his excellent book Jamie At Home. I made it recently to celebrate the delicious rhubarb which is so abundant right now, and I found this recipe as quick and easy at it was delicious. It got rave reviews at our table, especially from guests who had never had rhubarb before. And it came together so quickly and easily that I was still able to enjoy hanging out with my guests.
By the way, if you don't already have a copy of Jamie At Home, you need to get one. It's all about fresh, simple food made from homegrown ingredients, and it includes gardening tips, seasonal cooking, and even a chapter on wild game. The photography is so sensuous it borders on the pornographic, and the writing style makes it the kind of cookbook you can curl up to read on a rainy day. And, as you will see here, the recipes are fantastic.
JAMIE OLIVER'S SPEEDY RHUBARB FOOL
For the rhubarb compote:
1 lb rhubarb, trimmed and chopped
1/3 cup sugar or vanilla sugar *
Juice of 1/2 an orange **
For the wafers:
3 Tbsp confectioner's sugar
1 tsp ground cinnamon
Piece of frozen puff pastry
For the flavored yogurt:
2 cups plain yogurt
zest of 1 orange
1 heaped tablespoon honey
* I used 1/3 cup sugar plus 1 tsp vanilla; next time, I will substitute 1/4 cup honey.
** I used all the juice of the whole orange just because I wanted to.
Jamie says: "Get yourself a small pan and throw in the rhubarb, sugar and orange juice. Put a lid on top, bring to the boil for a couple of minutes, then remove the lid and simmer for a few more minutes until you get a thick compote consistency."
Meanwhile, sift the confectioner's sugar and cinnamon onto a clean countertop. Cut 4 slices about 1/2" thick from the puff pastry, then roll each slice out to 1/4" thick, turning it over a few times as you go so that it gets coated in the sugar and cinnamon. Cut the strips in half so you have long triangles, then fry those triangles in a hot dry skillet until golden brown on both sides. Cool them on a rack.
Mix the yogurt, honey, and orange zest together in a bowl. You can do this ahead of time and keep it chilled; you can also make the compote and pastry triangles ahead of time too and just assemble when you're ready to serve dessert. To serve, glop some yogurt onto a small plate or into a pretty glass bowl, then top it off with some rhubarb and pastry, and repeat the layers.
Welcome to April, Fool!
Thursday, April 1, 2010
How To Get Dressed In Seconds

One of my favorite things about spring is the return of Salad Season!
During the summer, I pretty much live on salad. It's good for breakfast, it's good for lunch, it's good for dinner, and it's good for just a random snack. If you grow your own salad greens and veggies, it's even better, but you don't have to. Just make sure you're going to a farmers' market or a good produce stand for the good stuff; plastic-wrapped iceberg lettuce really has no place on anyone's table.
Salads don't have to include lettuce at all, of course. It's great if they do, but you can be creative. In the summer, I make salads out of nothing but tomatoes piled high, sometimes sprinkled with crumbled cheese, and of course tossed with dressing. Tonight I'm making a sunchoke salad (think potato salad with more flavor), and last summer I made a fabulous salad out of grilled vegetables (which included eggplant, potatoes, onions, and turnips, if I remember right).
The real secrets to a good salad are the dressing - we'll get to that in a minute - and, most importantly, variety. Salads are satisfying when they combine lots of different flavors and textures into one huge sensory experience. The one in the picture, which was our lunch the other day, was made of a mix of young spring greens topped with sliced artichoke hearts, diced avocado, carrot shreds, raw kohlrabi, leftover BBQ chicken, and sunflower seeds. Think about all the nutrition in such a meal! So many vitamins, good fats, proteins, and everything else the body needs. It kept us full for hours, much longer than you'd think "just a salad" would.
But now for the dressing, which is crucial. Most of the time when you go to a restaurant, they'll serve you a perfectly healthy salad and then drown it in a dressing which is actually worse for you than anything else you could order. For example, here's how a salad at Wendy's weighs in:
1/2 Pound Double Cheeseburger - 750 calories, 42 g fat, 1520 mg sodium
Chicken BLT Salad - 790 calories, 53 grams fat, 1670 mg sodium
That's right, almost all the day's fat intake and most of your calories (and way more sodium than you need) in a damn SALAD! Some of that is in the processed chicken they use, but almost all of it is in the dressing, and bottled dressing from the grocery store is not much better. So make your own. (It's a lot cheaper that way too!)
Salad dressing, contrary to popular opinion, is super-easy to make yourself. All you need to remember is two parts oil to one part acid (which can be vinegar or acidic fruit juice). Play with different oils and different vinegars, and add whatever spices you like (paprika and cumin are delicious with balsamic and olive oil, for example). Here's my most common, foolproof standby dressing - it goes really well on just about everything, from green salad in the spring to tomato salad in the summer to hot potato salad in the fall and winter.
10-SECOND LEMON-DIJON VINAIGRETTE
1/2 cup olive oil
2 Tbsp rice vinegar (or white wine vinegar)
2 Tbsp lemon juice (see note!)
1 tsp Dijon mustard
1/2 tsp honey
1/4 tsp paprika
Salt and pepper to taste
Few drops of hot sauce, optional
Note: If you made the Preserved Meyer Lemons I posted about two weeks ago, use the juice from that and don't add any more salt to the dressing. You can even chop up one of the lemon wedges very fine and stir that in for extra zing!
Add all the ingredients together right there in the measuring cup and whisk them together with a fork for ten seconds. Pour into a pretty little serving container if you want, and serve. If you're keeping this on hand to use a little at a time, just store it in a jar and shake it up before using, or give it another whisk with the fork.
Easy-peasy!
Wednesday, March 24, 2010
The Spa In Your Kitchen

So your skin is blotchy, dry in patches and oily in others, looks ten years older than you are, and is just generally in need of restoration. You can go pay half a paycheck for a salon facial, or you can whip up this mask in the comfort of your own home, without even getting out of your pajamas.
Even though I'm good about moisturizing every day and taking care of my skin, I'm 30 years old and getting to the point where my face needs a boost every so often. Besides, I like to take a Beauty Day for myself every once in awhile. Sunday was one of those for me, and so I threw together a face mask...
1 Tbsp honey
2 Tbsp organic yogurt
1 egg white
That is it, ladies, no mas, finite. Whisk it up in a bowl with a fork until it's all evenly blended and that's your fancy-ass spa facial. Try to use raw honey and a free-range, organically grown egg. Save the yolk - you'll use it momentarily!
Hold a hot damp towel over your face to steam it for a minute, then dry it with a fresh towel and use your fingers to apply the face mask as thickly as you can, covering your face and under your chin. If you have a little more than you need, apply it to your neck and decolletage. Let it stay there for 20-30 minutes, or until it feels very dry and tight all over.
Meanwhile if you want to treat your hair too, take that egg yolk and whisk it with a tablespoon or two of coconut oil or olive oil. Apply that to the ends of your dry hair (ends only! no roots!) and comb through your ends with your fingers so that it gets evenly distributed. Let that sit for a bit as your face does - I like to spend this time soaking in a bubble bath with a good book.
When that face mask gets so tight you can't stand it anymore, now's when you wash it off very gently with warm clean water. Use an exfoliating scrub too, if you like. Shave, if you do, and massage your whole body neck to toes with coconut oil or olive oil to keep it soft and supple. Now wash and condition your hair as usual, but before you get out of the shower, dilute a little white vinegar with an equal amount of warm water. Pour that over your head for a rinse that will leave your hair super-shiny - don't worry, it won't make you smell like vinegar, I promise!
Now step out of the tub, apply your favorite facial moisturizer, and fix yourself up. Relax and enjoy feeling extra pretty!
Thursday, March 18, 2010
St. Patrick's Day: Potatoes!
Sure, we're doing corned beef in Guinness today just like everyone else (and a Guinness cake for dessert!), but let's take a moment to honor the Irish for their humblest contribution to world cuisine: the delicious potato. For some reason, Americans have recently decided that potatoes are bad for you. What a bag of hooey! Potatoes are among the most nutrient-dense foods out there, loaded with fiber to lower your cholesterol and keep you feeling full, rich in potassium, iron, copper, and heart-healthy vitamins.
In my opinion, the most healthful and delicious way to prepare potatoes is by roasting, especially if you roast them along with other root vegetables and tubers. We often have a side dish made with roasted potatoes, sunchokes, turnips, kohlrabi, carrots, celeriac, or any combination of the above. If you're ever confronted with an unfamiliar root veggie or tuber, throw it in with some diced potatoes and roast it up. And, for reasons I will explain in a minute, make double the amount that you need.
Here's our dinner from Sunday night: Steak filets cooked in a Jameson whiskey sauce with mushrooms, chard salad on the side, and there at the back is our roasted potatoes and sunchokes. The basic recipe for the roast veg follows.

"Oh, but Kimberly," you say, "That's way more than the two or three of us will eat in one meal."
That's right. You made extra roasted potatoes so you can use them again! Now you can put together a quicker meal with roasted-potato deliciousness and you won't have to wait an hour while they cook. They're very good tossed into soup (lentil soup is our go-to quickie dinner around here), or you can even toss them with a little pesto sauce and have them with fish, which cooks up in under ten minutes.
Or, you can make a nice frittata in the morning.

Do not underestimate potato frittata. It's so versatile - you can add sausage or bacon to it if you're so inclined, or whatever veggies you have on hand. The eggs give you a big protein wallop to start the day, and the potatoes will keep you feeling full well into lunch time. When I make frittata, I usually have it for breakfast and again for lunch, as it tastes absolutely delicious cold or at room temperature and goes so nicely with salad. This is a great one to take to work with you.
Happy St. Pat's, don't drink TOO much beer, and make sure you wear a little green today!
In my opinion, the most healthful and delicious way to prepare potatoes is by roasting, especially if you roast them along with other root vegetables and tubers. We often have a side dish made with roasted potatoes, sunchokes, turnips, kohlrabi, carrots, celeriac, or any combination of the above. If you're ever confronted with an unfamiliar root veggie or tuber, throw it in with some diced potatoes and roast it up. And, for reasons I will explain in a minute, make double the amount that you need.
Here's our dinner from Sunday night: Steak filets cooked in a Jameson whiskey sauce with mushrooms, chard salad on the side, and there at the back is our roasted potatoes and sunchokes. The basic recipe for the roast veg follows.

ROASTED TUBERS
You can use all potatoes for this, or make it more interesting by subbing in any combination of the roots and tubers I mentioned above. (Yes, I know kohlrabi is neither root nor tuber, but honestly I don't know what category it goes in, and from a culinary standpoint I treat it just like a turnip whenever I use it raw or cooked.) I especially recommend sunchokes, also known as Jerusalem artichokes; if you use them, remember DO NOT peel them. Ever. The skins are tasty and all the nutrients are directly under the skins, so just scrub them thoroughly with a brush and leave those skins on!
5 cups diced tubers and roots
1/2 cup olive oil
2 Tbsp balsamic vinegar
2 sprigs fresh minced rosemary, or 1 Tbsp dried
1/2 Tbsp paprika
Salt and pepper to taste
Preheat the oven to 450 F (225 C). Chop up your veg and spread them out in a casserole dish. Whisk together the remaining ingredients and pour it all over the veggies, then use your hands to toss it all together so it's evenly distributed. Slide that dish in the oven and roast for half an hour; stir it all up, then roast for another half hour until those veggies are nicely browned and cooked through.
"Oh, but Kimberly," you say, "That's way more than the two or three of us will eat in one meal."
That's right. You made extra roasted potatoes so you can use them again! Now you can put together a quicker meal with roasted-potato deliciousness and you won't have to wait an hour while they cook. They're very good tossed into soup (lentil soup is our go-to quickie dinner around here), or you can even toss them with a little pesto sauce and have them with fish, which cooks up in under ten minutes.
Or, you can make a nice frittata in the morning.

Do not underestimate potato frittata. It's so versatile - you can add sausage or bacon to it if you're so inclined, or whatever veggies you have on hand. The eggs give you a big protein wallop to start the day, and the potatoes will keep you feeling full well into lunch time. When I make frittata, I usually have it for breakfast and again for lunch, as it tastes absolutely delicious cold or at room temperature and goes so nicely with salad. This is a great one to take to work with you.
VEGGIE FRITTATA
1 Tbsp butter or olive oil
1 leek, sliced -OR- 1/2 onion, diced
2 cloves minced garlic
2 cups leftover roasted potatoes (and other tubers if applicable)
1 carrot, grated
1/2 cup baby spinach
6 eggs
1/4 cup milk
1 tsp paprika
1 tsp dried oregano
salt and pepper to taste
1/4 cup grated cheese (optional)
Preheat the oven to 450 F (225 C).
In a heavy, oven-safe skillet, melt the butter or olive oil over medium-high heat. Throw in the onion or leek, saute until it softens, then add in the garlic and potatoes. Continue sauteeing until the garlic starts to turn golden, stir in the grated carrots, and keep going until they soften up a bit.
While the veggies are cooking, crack all the eggs into a bowl. Add the milk, paprika, oregano, salt, and pepper; beat it with a whisk or fork until it's an even mixture. Set aside and stir the cooking veggies. When the carrots are soft, stir in the spinach and cook another minute or two until the spinach wilts, and then spread everything out evenly in the skillet. Pour in the egg mixture and tilt the skillet around to make sure the egg is evenly distributed. If you're using cheese, sprinkle that on top.
Stick the skillet into the oven and bake it for about 10-15 minutes, or until the eggs have set and a knife inserted into the center comes out clean. Slice into pie wedges and serve.
Happy St. Pat's, don't drink TOO much beer, and make sure you wear a little green today!
Subscribe to:
Posts (Atom)
