Showing posts with label fruit. Show all posts

Thursday, June 24, 2010

Rosemary-Balsamic Strawberry Shortcake


So you went to the U-Pick like I suggested yesterday, right? And now you picked too many strawberries and you want a good recipe to use some of them up? Well good, because I just came up with this snazzy little number and I'm eager to share my success with you.

Oh, you will not believe how well these flavors go together!

ROSEMARY-BALSAMIC STRAWBERRY SHORTCAKE

Shortcake Biscuits:
2 cups unbleached white flour
2 Tbsp fresh rosemary, finely chopped
1 Tbsp sugar (vanilla sugar, if you have some!)
2 tsp baking powder
1/2 tsp cream of tartar
1/2 tsp salt
1/4 tsp baking soda
1/2 cup very cold butter, cubed
Generous 1/2 cup half-and-half (plus extra for brushing)

Strawberry Filling:
3 cups strawberries, trimmed and halved
3 Tbsp honey
2 Tbsp balsamic vinegar
1 tsp fresh rosemary, finely chopped

Good-quality vanilla ice cream or sweetened whipped cream

Preheat the oven to 350 F. Toss all the dry ingredients for the biscuits into your food processor and mix them up, or do it by hand in a bowl. Cut in the butter, pulsing with the food processor or crumbling into the flour mix with your fingers, until it resembles a coarse meal. Slowly add the half-and-half, and pulse or combine until it's just blended in (the dough will still be crumbly).

Pat the dough into a ball, giving it a little knead if it's not holding together, and roll it out to about an inch thick. Use a glass or biscuit cutter to cut out large rounds; brush them with a little half-and-half, and bake them for 20 minutes or until done.

Meanwhile, mix the strawberries with the honey, balsamic, and rosemary. Set aside for at least half an hour or so. When the biscuits are done, set them aside too and let them cool.

When everything's ready, split a shortcake biscuit in half and top the bottom half with the strawberry mixture. Set the top half of the biscuit on top, spoon a little extra strawberry love around the plate, and top the whole shebang with a scoop or two of vanilla ice cream or whipped cream.

Enjoy on the porch and relish the feel of a summer evening.

Wednesday, June 23, 2010

Tight-Arse Tuesdays: U-Pick


I'm heading out in a little while today to pick strawberries with a friend, and I thought - what better frugal tip for a Tight-Arse Tuesday?

'Tis the season for U-Picks, and you'll find them within 30 minutes of your location, I can almost guarantee it. If you've never done it before, it's a great way to get out in the sunshine, and teach your kids (if you have them) about nature and food. Sometimes you bring your own container, sometimes they have containers for you; once you get to the farm, just start picking until you've got more fresh-picked fruit than you know what to do with.

Strawberries are common at U-Picks, as are blueberries, tree fruits, and sometimes grapes. I've occasionally seen vegetable U-Picks but it seems to be mainly a fruit thing. Start looking for a U-Pick farm near you at PickYourOwn.org.

Of course you'll want to enjoy a lot of your fruit in its freshness, but make sure you pick extra for preserving. Homemade jams and jellies are SUPER easy, and freezing is even easier! Wouldn't it be great to toss some of your frozen strawberries into a smoothie or some fruit bread later this winter, and have the flavor transport you back to that beautiful day in June when you laughed in the sun as you picked them?

Saturday, May 29, 2010

Farm-Fresh Friday: A Thought.


Yesterday I went to a new farmers' market, which is always a fun experience. This one was on the beach, so we sampled fresh-grown California strawberries while listening to the Pacific crashing nearby. Everything looked delicious, so we took it home and made a nice big feast for dinner:

Marinated London Broil
Arugula-Strawberry Salad with Fried Shallots
Grilled Corn on the Cob
Grilled Asparagus
Lemon Meringue Pie

The pie was left over, and the meat didn't come from the farmers' market, but honestly those were the least enjoyable parts of the meal (incredibly delicious though they were). It was the farm-fresh tasty that rocked my world - the sweet, juicy corn that didn't even need butter, the asparagus all crisp and delicious, and best of all, the salad, with the sharp bitter arugula as a perfect complement to those sweet, succulent strawberries.

It got me thinking (again) that 90% of cooking is in the ingredients you start with. That corn, that asparagus? Just tossed them in a bowl with some olive oil, salt and pepper, and rubbed with a bit of garlic. Then they only took a few minutes on the grill while the meat cooked up. Good veggies don't need much of anything to make them delicious. A lot of people who think they can't cook, because whatever they turn out tastes bad, are just starting out with shitty ingredients that Bourdain himself couldn't do anything with. Start with good, organic, farm-fresh produce and you really would have to try very hard to screw it up.

Tuesday, May 4, 2010

The Perfect Pie Crust (and it's gluten-free!)


I know a lot of people are cutting out gluten nowadays. I'm not on that bandwagon, but I'm always willing to try new things, and I had a hunch that gluten-free pie crust might be better than the traditional kind. I was right!

See, when you make pie crust, gluten is your enemy. The more you work the flour, the more you handle it and the more the butter melts into it, the more it glutenizes. That formation of gluten is what turns a pie crust tough and makes it turn out like bread or a cracker. All those little tricks people tell you, about keeping everything cold and handling it as little as possible and refrigerating it between every step and keeping your hands ice-cold but dry - that's all to prevent the formation of gluten. So why not just use gluten-free flours?

That's what I did, but I also kept my traditional pie-making tips. I'll give you the recipe I used, but you can also use these same techniques on a traditional pie crust recipe if you want to. They work!

THE BEST (AND EASIEST) GLUTEN-FREE PIE CRUST

1 3/4 cup brown rice flour
1/4 cup tapioca flour
1/4 cup arrowroot
1/2 tsp salt
2 Tbsp confectioners' sugar
1 tsp cinnamon, 1/2 tsp nutmeg, 1/4 tsp cloves (all optional)
3/4 cup butter, frozen
1 egg
1 Tbsp apple cider vinegar
5-6 Tbsp ice water

Mix the dry ingredients together thoroughly. Then grate the butter with a cheese grater, or cut it up into small cubes, and add it in. If you have a food processor, pulse it all together until it looks like coarse sand; if you don't, get in there with your fingers and crumble the butter in. (This can be very relaxing on a stressful day.)

Beat the egg and vinegar together, and pour into the flour-butter mix. Don't skip the cider vinegar, whatever recipe you're using! You can cut back on the water by 1 Tbsp so it balances out, but the cider vinegar is a big secret for perfect pie. Stir the liquid in slightly with a fork (or pulse in the processor) until it's mostly even, and then add the ice water just a tablespoon or two at a time, mixing (or pulsing) after each addition. Eventually it'll be a nice dough - not sticky, not springy. It'll be crumbly, but when you roll it into a ball it will hold its shape, like this:


So divide it into two parts, one slightly bigger than the other, and roll each into a ball.

At this point you would normally refrigerate the dough for awhile, giving it a chance to rest and dragging out the time it takes to make a pie by hours or a day. Fie, says I. Now you don't have to. You can roll it out right the heck now. Take it over to the table, unless you're really tall, because it's hard to get the right leverage for rolling out a crust on the countertop.

Some people say to roll out pie crust on wax paper. I don't do this or recommend it, because I always find that it tears up into little pieces, which get embedded in the pie, and it's a pain in the ass to remove them. So I like parchment paper, but when I don't have any on hand (like today), I use plastic wrap. Whichever you're using, spray a little water on the table and spread the paper/plastic over it - the water will hold it in place so it doesn't slide around when you roll it.

Drop the bigger of the two doughballs on top, cover it with another sheet of paper/plastic, and get to rolling. Change direction every so often so you get a nice big circle. You want it REALLY thin, so keep going until it's a huge thin circle. Peel off the top paper/plastic. Then put the pie plate on top of the crust, upside-down. Slide your hand underneath and flip the whole thing over carefully. Now smooth the crust over the inside of the pie plate, making sure that it's sitting nicely against the sides and bottom and hanging over the edges. Carefully peel off the paper/plastic, like so:


It might rip as you go. That's fine. Pinch it back together. No one's going to notice or care. The great thing about gluten-free pie crust is the fact that you can't overwork it!

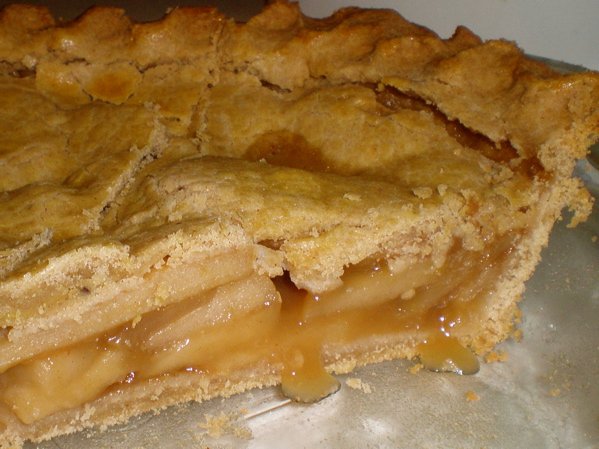
Now repeat the process with that other doughball, which will be your top crust. When it's rolled out all nice and thin, put your filling in the bottom crust - in this case an apple-pie filling I made back in October and froze in a pie plate so that it would be the right size and shape to just plunk down in the crust without thawing.


Once the pie is filled, carefully lay the top crust over it and peel the bottom layer of paper/plastic off like you did before. Then seal the crust by crimping around the edges - hold your two index fingers horizontally, facing each other, and make a little V by pushing each one in. Once it's crimped, trim the excess off the edges, so it looks like this:


At this point I highly recommend brushing some beaten egg on top. It's not necessary, but it'll give you a nice golden crust with texture. And if you're adding a decoration (about which more in a minute), it'll help it stick.


Now for decor! You've got that big heap of trimmings right there, after all. I usually like to take some of those trimmings and make a little ornament to go on the crust. Since this is an apple pie, I made an apple. I've also made hearts, stars, and other easy-to-cut-out little shapes. If you're not inclined to do this, don't bother, it isn't necessary.

What you do need to do now is cut some vents. This can just be a couple of slits, it can be an X, or you can make a little star-type design with the vents like I did.


Another optional thing - I recommend sprinkling the whole pie with a bit of sugar here. It gives the crust a bit of texture, and an appealing, rustic look that kind of sparkles when the pie is done. You don't need much, just a teaspoon or so (I never measure it, I just grab some sugar in my fingers and give it a good dusting).

Now you're ready to bake. This is going to vary depending on your filling, but with a fruit pie I start out with the oven at 450 F. I bake it for 15 minutes, then lower the heat to 350 F and continue baking for another 45 minutes. That shock of hard heat at the beginning is what melts the butter and creates little air pockets which result in a nice flaky crust.

When the pie is done, let it cool, or the inside filling may be runny. It's most delicious while still just a bit warm though!


Heavenly.

Friday, April 2, 2010

Pity the Fool!


What better day than April Fool's Day to make a nice and tasty fool?

This British dessert is a great way to showcase seasonal fruits. Usually, the fruit is pureed and then blended with whipped cream and egg whites to give it a fluffy, mousse-like texture. Occasionally the fool is then layered with cake or pastry to dress it up.

Jamie Oliver has a better version in his excellent book Jamie At Home. I made it recently to celebrate the delicious rhubarb which is so abundant right now, and I found this recipe as quick and easy at it was delicious. It got rave reviews at our table, especially from guests who had never had rhubarb before. And it came together so quickly and easily that I was still able to enjoy hanging out with my guests.

By the way, if you don't already have a copy of Jamie At Home, you need to get one. It's all about fresh, simple food made from homegrown ingredients, and it includes gardening tips, seasonal cooking, and even a chapter on wild game. The photography is so sensuous it borders on the pornographic, and the writing style makes it the kind of cookbook you can curl up to read on a rainy day. And, as you will see here, the recipes are fantastic.


JAMIE OLIVER'S SPEEDY RHUBARB FOOL

For the rhubarb compote:
1 lb rhubarb, trimmed and chopped
1/3 cup sugar or vanilla sugar *
Juice of 1/2 an orange **

For the wafers:
3 Tbsp confectioner's sugar
1 tsp ground cinnamon
Piece of frozen puff pastry

For the flavored yogurt:
2 cups plain yogurt
zest of 1 orange
1 heaped tablespoon honey

* I used 1/3 cup sugar plus 1 tsp vanilla; next time, I will substitute 1/4 cup honey.
** I used all the juice of the whole orange just because I wanted to.

Jamie says: "Get yourself a small pan and throw in the rhubarb, sugar and orange juice. Put a lid on top, bring to the boil for a couple of minutes, then remove the lid and simmer for a few more minutes until you get a thick compote consistency."

Meanwhile, sift the confectioner's sugar and cinnamon onto a clean countertop. Cut 4 slices about 1/2" thick from the puff pastry, then roll each slice out to 1/4" thick, turning it over a few times as you go so that it gets coated in the sugar and cinnamon. Cut the strips in half so you have long triangles, then fry those triangles in a hot dry skillet until golden brown on both sides. Cool them on a rack.

Mix the yogurt, honey, and orange zest together in a bowl. You can do this ahead of time and keep it chilled; you can also make the compote and pastry triangles ahead of time too and just assemble when you're ready to serve dessert. To serve, glop some yogurt onto a small plate or into a pretty glass bowl, then top it off with some rhubarb and pastry, and repeat the layers.


Welcome to April, Fool!

Tuesday, March 16, 2010

When life hands you lemons...

...salt 'em up.


Over the holidays, my dad gave me one of my new favorite cookbooks, Well Preserved: Recipes and Techniques for Putting Up Small Batches of Seasonal Foods by Eugenia Bone. I love canning, but even I sometimes get sick of jam, and there's always the question of what you do with the stuff in those jars once you're ready to use them. This book solves both problems, with amazing recipes for unique, delicious preserves as well as multiple recipes for utilizing each one.

For example, there's a recipe for salty brined Meyer lemon preserves. Once those are done, you can use them in soups or tagine, or in the cookbook's recipes for Preserved Meyer Lemon Risotto or Chicken Cutlets with Preserved Meyer Lemons and Parsley. The possibilities are endless since salt and lemons go with just about everything!

Now is the time to get in on Meyer lemon action; they're at their best if you can find them at a farmers' market or a good co-op. You can use regular lemons, but you'll need to juice more of them and they won't be as good. Trust me, if you haven't tried cooking with Meyer lemons, they make a world of difference - the skin is thin and flavorful, almost all zest with very little pith, and the flesh is sweet and succulent and oh so juicy, like a fresh-picked heirloom tomato. You want to put up some of these now so that you'll have salty lemon goodness to go with all your spring asparagus and cucumber salads later.

To start: Take two half-pint canning jars and run them through the dishwasher, keeping them very hot until you're ready to use them. Or boil them in a large pot of water to sterilize that way. Simmer the round flat lids to soften the rubber seal (you don't have to sterilize the rings).

You will need 10 Meyer lemons, and 1/2 cup of salt. That's it.

Juice four of the lemons, getting as much of the juice out as you can, and set aside. Trim the stem-ends off the other six lemons, then quarter them into wedges. Sprinkle a little salt in the bottom of a jar, then cram the lemon quarters into it, packing them in however they fit together with as little space as possible. Sprinkle salt in there as you go, so that the salt is evenly distributed, and do both jars so that you wind up with 12 lemon wedges and 1/4 cup of salt in each one. Pour half the juice into each jar and knock it around, tilt it, run a knife around the edge, whatever you need to do to make sure there are no air bubbles. Put the lids on - not super-tight - and set aside on the counter.

Mark your calendar for two weeks from now. Every couple of days between now and then, pick up each jar and roll it all around. Don't shake it, but mix it all up so that the salt dissolves evenly into the juice. (It'll take it a couple of days to dissolve completely.) Let them ferment for the full two weeks, and then they're ready. Move them into the fridge at that point; they'll be good for six months if they last that long!