Saturday, February 27, 2010

Farm-Fresh Friday: Tuna Casserole

This photo is not my tuna casserole. This photo is an attempt at a different casserole in an attempt to be be different that I was then told was not as good as my tuna casserole.

To be honest, my tuna casserole recipe is embarassing. I don't want to post it. It's what I ate as a bachelorette from all the cans of crap in my cupboard when I was hungry and lazy. I remember my mother making this regularly and I remember loving it as a child. I've tried making it with fresh ingredients but for some reason (and I'm guessing that reason is salt) it doesn't taste as good. But it's easy. And it's quick. And it's delicious. Oh, and it's cheap.

2 cups pasta, tubular or spiral (when ultra lazy and at the end of my packets, I'd mix them to use them up)
1 can cream of mushroom soup
1 can peas, drained
1 can corn, drained
1 average can tuna, mercury free, because even as a bachelorette I was 'picky' (my excuse)
1 cup cheese
Salt/Pepper to taste (though I don't use salt - I feel the corn and cheese has enough)


Preheat oven to 180/360
Boil pasta and drain. Normally people say to mix all the ingredients in a bowl, but I never did. I always put them directly in the casserole dish and stirred it around with a butterknife (see.. this IS embarassing) until it was mixed. If the dish looked a little low and I had it on hand, I'd add some cream, but not often. It's perfect as is.

Bake for twenty minutes with lid on, ten minutes with lid off.

I wish I was joking when I say everyone loves this recipe. I didn't want to post it. I wanted to make some fancy fresh chicken casserole for this post and was immediately told it wasn't as good as my 'casserole from a can'. DAMN. Curses. Narf!

Spoon into bowls. Feeds four, but I could eat the thing by myself in front of the TV straight from the casserole dish.

Thursday, February 25, 2010

Beetroot Cobb Loaf Dip


roasted cashews 50g
2 beetroot
1 clove garlic
250mL sour cream
1/3c parmesan
10 pink peppercorns
1/2 tsp cumin
1tsp paprika
1/4 tsp cinnamon
juice/zest one lemon

I didn't have roasted cashews so I toasted them on a dry pan for a few minutes. Turned out lovely. Almost forgot to put them in the dip!

Get an entire head of garlic and slice off the top. Drizzle in oil and sprinkle with salt.

Roast the beetroot and garlic in a 160° C oven for forty five minutes or until soft and sweet and delicious looking. When cool, turn the garlic (which should be like a paste now) from the bulb into a jar. Save one clove for this dish. Use the rest on anything - 'cause man, it's tasty. I'd go so far as to butter and garlic the cobb loaf for this - and am now kicking myself for not thinking about it.

Combine all ingredients in a food processor until smooth.

Using a knife, cut a circle with a notch (for memory) out of the top of the loaf. Remove innards and place both pieces of bread and loaf crust under the boiler until toasted.

Place beetroot dip inside.

Enjoy on a picnic!


Wednesday, February 24, 2010

Tight-Arse Tuesday: Sowing Your Seed

If you're in the northern hemisphere, the weather out there on this February morning is probably not anything that makes you want to get out into the garden. Get started now, though, and you can save a LOT of money by starting your own seeds.

By the time the weather's nice enough to start planting outside, you've already missed the buss on a lot of delicious, healthy spring vegetables, and you've cut your tomato season short. Or you'll have to pay several dollars for each little baby plant, when you could've started even more plants for less than the cost of one.

So first find yourself some containers. Those little flats that you buy veggie transplants in work fine, but you can also use tin cans, yogurt cups, paper coffee cups, etc. Just punch a couple little holes in the bottom for drainage and they're good to go! Fill each one about 3/4 of the way (at least a few inches deep) with seed starting mix - note that this is NOT potting soil. Potting soil is too heavy for seeds. But don't worry, seed starter is not expensive.

Once you've got them all ready, make a little hole in each one (a few holes in each if you have a larger container like a butter tub) with a pencil, about as deep as it says to plant on the seed packet. Drop a couple of seeds in each hole, using tweezers for tiny seeds, and gently brush the soil over them. Mist liberally with water from a clean spray bottle; don't pour water in or you'll disturb the soil and move the seeds around. Label each container with masking tape and a Sharpie so you remember what's planted in each one.

Now you have to keep them warm. If it's cold where you are, you can cover each container with plastic wrap to make it a mini-greenhouse, just keep an eye on things to make sure it's not getting too hot inside. (If it is, you can lift a corner of the plastic for ventilation.) Another thing you can do is put your little pots on a cookie sheet and set that on top of a heating pad. Don't get it so hot that it bakes your plants, but this is a great way to keep your little seeds all snug and cozy.

Mist them with water every few days, or if your containers are shallow, pour a little water into the cookie sheet and let them wick it up from underneath.

In a week or so, you'll have small green babies crowning through the soil. Make sure they're in a place where they can get plenty of sunlight, or point a flourescent light at them for most of the day. You can switch on the flourescent light when you get up in the morning and shut it off after dinner in the evenings.

Let them keep growing this way for a few weeks, until it warms up outside and there's no more danger of frost. At that point you'll already have all your pretty little veggie starts and you won't have to go pay a fortune for them at the garden center. And delicious, homegrown veggies will only be a few weeks away!

Friday, February 19, 2010

Shiny Manageable Hair. Cheap.


I was hesitant at first to get into washing my hair with baking powder and vinegar. Doesn't that combination blow up? What about my dyed red hair? What about the smell? Surely such cheap kitchen products can't give me amazing hair - why of COURSE that's what shampoo companies have conditioned (pun intended) you to think. I give you what is horribly labeled as the "no poo" option, meaning, No Shampoo.

Here I have made a paste from bicarb (baking soda) and a splash of water until it becomes the consistancy of shampoo. I'm still considering pre-making this and putting it in an old shampoo bottle actually, but I am uncertain if it will dry out, so don't quote me on it. Now, I'm out of apple cider vinegar (and honestly, you can use normal vinegar, I just prefer the apple cider to my dyed red hair). Mix a few tablespoons of that with water as well. Preferably cups of water. Now head to the shower.

Shampoo with the bicarb as normal. Scrub into the hair. You'll feel strange doing this at first. You'll feel even stranger with the vinegar rinse but trust me, it does work. Even my fiance is doing this and loving it with his natural red hair (some men have all the luck). Rinse the bicarb out as well as you can before doing the vinegar rinse for obvious reasons. This will feel almost like conditioner, as it detangles your hair, but not quite. Trust me, your hair won't smell. Once I was in a rush and poured the vinegar straight onto my head. Still, no smell.

Some people complain of feeling the grease form on their crown before any other place and others have said to remedy that by using a boar bristle brush to distribute the oils. I have not had this problem. I also already have a boar bristle brush, so the advice may or may not be accurate.

Either way, this is yet another way your kitchen can save you tons of money over the years. A giant bottle of vinegar and a box of bicarb are exceptionally cheaper than shampoo, even moreso than the expensive salon stuff I was using just a few days prior to this experiment. And you know what? I'm never buying that 'stays in your hair' chemical crap again! $$$ for me!

Thursday, February 18, 2010

On "Guilt"

I have before me the new "Fearless Flyer" from Trader Joe's. For those of you without a Trader Joe's nearby, it's a supermarket that features "natural" (typically organic, but not always) foods. Some of it is good, but it's all processed packaged food just the same - they do have a produce section, but it's generally a pretty shoddy one compared to the quality of the rest of the goods they offer, and I've never understood why they feel compelled to package the produce the way they do - I mean, what is the point of shrink-wrapping a potato in plastic?

They do offer very inexpensive, high-quality booze there, plus the famed Charles Shaw wines (Two-Buck Chuck or Three-Buck Chuck, depending on your area), which I use very successfully as cooking wines.

Anyway, they send out this newsletter every so often with a description of their featured products. It's amusingly written and I leaf through it whenever I get it in the mail. This time I noticed a particular emphasis on the word "guilt" - as in "Reduced Guilt Organic White Corn Tortilla Chips" and other "Reduced Guilt Fare."

It got me thinking. Why do we as a society invest so much of our eating with guilt? Is it a vestige of our Protestant beginnings? Anthony Bourdain once observed, "Food is the new porn," and I believe he was on to something. Food now occupies the prurient back room that sex (which is now, for the most part, more guiltless than tortilla chips) once occupied.

It doesn't have to be that way. I much prefer Michael Pollan's philosophy: "Eat food. Not too much. Mostly plants." There's room for just about everything in there - everything, that is, that humans evolved to eat, which does not include the chemicals and refining packaged as edibles by Corporate America.

So cast off that guilt. Eat butter, eat good stuff, eat to enjoy. Relish everything you put into your mouth, just as you relish what you'd put into other parts of your body! Life's too short to do otherwise.

Wednesday, February 17, 2010

Tight-Arse Tuesdays - Make your own Protein bars


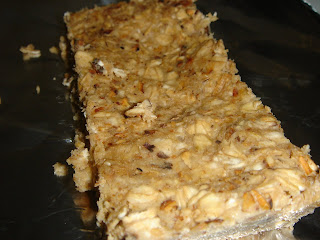
This is by no stretch of the imagination the cheapest thing to do, but it is also without a doubt cheaper than buying protein bars. In my area, the foul tasting things are $4 a piece! My husband and I are both body-builders and heavy into fitness, so these things, used as a quick protein hit to continue weight loss*, can be very expensive on our pocket book. Protein powder, while not cheap, is still significantly cheaper; most recipes needing a mere 3 scoops per 8 bars. I'd say, on average, the bars do not cost me more than fifty cents each. A savings of 88%... I think I can live with that.

Now I'd also like to mention here that legumes are one of the WORST sources of protein if you're building. "But everything has peanut butter!" Yeah, and everything has chocolate too. Ain't that damn healthy. So these bars will provide a larger protein hit, cost less and probably taste better. Guaranteed, actually. If these bars do not taste better, I will give you your money back.

Basic NutButter Oatmeal Protein Bars

2 cups dry oatmeal, dry toasted on a naked pan until tasty but not burnt
3 scoops protein powder
1/2c hazlenut butter, macadamia butter, or another nut butter. I use cashew.
1/3c whole fat milk

I use whole fat milk because 1. it tastes better and 2. fat is good for you. While you're shovelling protein in your face, it's good to make sure that face is clear and rosy, right?

Combine all ingredients in a bowl and press down using wax paper into a brownie tray. Freeze for forty minutes. Cut into bars, wrap in alfoil and refridgerate until headed out that day.

Apple Pie Protein Bar - Soft

Ingredients

6 tablespoons vanilla protein powder
2 tsps baking powder
4 teaspoons Splenda
2 eggs
2 tablespoons butter
2 tablespoons water
1/2 cup chopped apple -- (chopped into tiny pieces)
1 Tbl vanilla extract
2 teaspoon maple syrup
2 teaspoon cinnamon
1 teaspoon fresh ground nutmeg

Preheat oven to 160/320
Mix together dry ingredients.
In separate bowl mix together eggs, oil, and extracts. Beat well & then add to dry ingredients, mixing well.
Add water and apple. Should be a wet consistency like a cake mix.
Pour into well-greased bread pan.
Cook for 15-25 minutes until a toothpick comes out clean. May take longer to cook, depending on consistency of protein powder used. (Mine took 35 minutes, so this is incredibly variable).

Should be a soft cakey bar that tastes similar to an apple cake or pie. Not as firm as most bars, but a good little protein grab.


*Protein, when ingested frequently, burns more calories than going hungry. All foods do this, but protein more so. If you're planning on dieting, a constant supply of protein is very beneficial. As with all diets, don't overdo it.

Tuesday, February 16, 2010

Chicken Wings!


If somebody did something nice for you for Valentine's Day, pay him back. Make some delicious honey-hot chicken wings, open up a beer, and kick back with a good movie. This was part of Valentine's Day at our house and it was delicious!

You can use canola oil, vegetable oil, or any regular fry oil to cook the wings, but I have to put in a plug here for peanut oil. Typically we're organic canola fryers (regular canola is often genetically modified, which is scary, so get organic!), but yesterday we tried peanut oil for the first time and we liked it so much better. It doesn't make the house smell like fry oil, the way canola does, and it has a lighter, cleaner taste. So use peanut oil for this if you can. You'll need enough to fill your heaviest skillet about an inch deep.

HONEY-HOT WINGS

2 lbs chicken wings, separated (little wings and drummies)
Fry oil, about an inch deep

Coating:
1/2 cup wheat flour
1/2 cup chickpea flour (see note)
1 Tbsp garlic powder
1 tsp chipotle powder
1 tsp paprika
salt and pepper to taste

Sauce:
1/4 cup butter
1/4 cup hot sauce (I like Tapatio)
3 Tbsp honey
1 tsp Dijon mustard
1/2 Tbsp garlic powder
1/2 tsp salt
1/4 tsp black pepper

* Note: Chickpea flour is worth it if you can find it in your area. It's got a lot of tasty applications, but my favorite is frying; it fries up so nicely, not just in falafel but in anything. A few months back I used chickpea flour to create gluten-free fried green tomatoes for a friend and now I wouldn't have them any other way. So if you can't find chickpea flour, then use a full cup of wheat flour, but it's worth it to look for the chickpea kind. And if you're gluten-free, you can just use all chickpea flour for this!

Anyway, rinse the chicken pieces and pat them as dry as you can get them with paper towels, and then pour that fry oil into your heaviest skillet and heat it up. While it's heating, mix all the first set of ingredients - flours, garlic, chipotle, paprika, salt and pepper.

Once the oil is hot, drop the chicken pieces into the flour mixture one at a time and get them nicely coated. Fry the coated chicken pieces about 5-7 minutes on each side, working in batches, until the chicken is cooked through. Drain on paper towels.

Meanwhile, as the chicken cooks, melt the butter in a small pot over medium-low heat. Add the rest of the sauce ingredients, whisking gently with a fork to blend it all together. Let it simmer, whisking every few minutes, while you finish cooking the chicken.

When the chicken pieces are all done, put them all in a big bowl and pour the sauce all over them. Toss the chicken to coat it all with the sauce, and serve with carrot and celery sticks. Add a bowl of bleu cheese or ranch on the side if that's your thing. To make it a meal, you can slice up potatoes and fry them up for a minute or two in the same oil you fried the chicken in. (Of course, a salad is also a nice accompaniment to keep it a bit healthier.)


Saturday, February 13, 2010

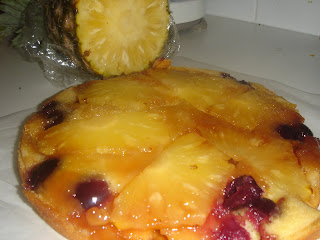
Farm-Fresh Friday: Pineapple Upside Down Cake


Pineapple Upside Down Cake is a 1970s classic tea cake designed to be eaten with 'tea', AKA vodka and schapps. I couldn't think of a single thing more cliche to post and since I'm a big fan of overexposed cliches, I thought I'd share.

Now I hate canned pineapple and I hate maraschino cherries, so I used fresh. I got an awesome little dodad which pits cherries in one swell foop. I only needed 6 cherries and three slices of pineapple cut in half for this, which is always a nice thing.

For the cake:
1 1/2c type "00" flour
2/3c sugar
2 tsp baking powder
2/3c milk
1/4c butter
1 egg
1 tsp vanilla

Combine dry ingredients then add wet. Really I don't know why I even need to say this, it's so obvious. I bunged it all in my kitchen aid and let it go for a couple minutes and it was done.

Upside Down Topping
1/4 pineapple
6 cherries
2 tablespoons butter
1/3 cup brown sugar

Melt the brown sugar and butter in a ban-marie and pour at the bottom of a round 9" pan. Layer your pineapple slices and cherries onto the pan in the sugary goo. Pour cake batter over and bake at 180° for half an hour.

Of course if you use shiny pretty canned fruit with ten times more sugar, the design will be slightly more attractive, but I prefer it much more natural. 2/3c sugar is still quite a bit for something you don't really need in your diet, so I like the fruitier approach, but feel free to use canned pineapple if you wish.

Flip rightside upside down and serve warm with ice cream and peach vodka. Or tea. Or peach vodka.


Wednesday, February 10, 2010

Coconut Oil!

Continuing off Lizzie's beauty treatments of yesterday, here's a little plug for one of nature's greatest gifts: coconut oil!

Now personally, I am not a fan of coconut as a culinary ingredient. I don't like the flavor, I hate the texture, and something about coconut milk is just off-putting to me. The oil, on the other hand, is a miracle worker. It has numerous health benefits - both inside and outside your body. It may even help you lose weight!

To cook with it, use just a spoonful of it when sauteeing (just as you would any oil), or substitute it for butter when making a grilled cheese. It melts very quickly and easily, and doesn't have a coconut flavor so don't worry about it affecting your foods.

My favorite use for it, however, is for skin care. Since I began using coconut oil a couple years ago, my skin has become more soft and supple than it's ever been, and I never need to use lotion anymore. When I moisturized with lotion, I always found my legs drying out by midday, but with coconut oil I haven't had any dry skin problems at all.

Just take the jar of coconut oil into the bath with you, and drop the jar (tightly sealed) into the tub so that the oil melts to liquid. After you shave, massage the oil into your legs, and keep going until you've massaged it into your whole body from the neck down. Don't use it on your face, and (ahem) feel free to bring in someone to oil your back for you if you can't reach it by your lonesome!

If you feel a little oily when you get out of the tub, that's okay; it'll absorb into your skin as you dry off. For maximum benefit, hang out naked for a few minutes and air-dry. You'll help the moisturizing along because you won't be able to stop checking out how smooth and silky you feel.

For even more benefit, apply coconut oil to your dry hair (Ends only! Not your scalp!) when you first get into the tub and let it sit there for awhile. You can read a book, sip wine, shave your legs, or just doze a bit in that hot steamy bath and the coconut oil will soak in and make your hair super-glossy and soft. Once it's sat for a bit, shampoo and condition your hair as normal and then style it however you usually do. You'll notice a difference right away!

Tuesday, February 9, 2010

Beauty Masks from The Kitchen

Like every other woman seeking the fountain of youth, or the fountain of staying youthful without ever getting old, I've tried every cream in the book. Expensive creams. Cheap creams. De La Mer to Jurlique to Sally Johansen to Johnson & Johnson, I've tried it. Things like collagen in creams are just pointless, because the body only absorbs collagen intestinally, so you're just smearing it on your face for no reason. However, those expensive creams all have one major thing in common - they use natural ingredients. Nature is the fountain of youth, y'all, gotta break it to you. While you're not going to be eating your collagen-filled cream anytime soon, you can however use things you eat to make the same creams!! Or at least, have the same effect as those creams.


Here, I bring you my current favourite scrub... crystalized honey. In my opinion, this is like the holy grail of beauty supplies and it's not possible to find at a shop. Ever. You're going to need to know someone to get this. It's like an illegal drug - only not illegal. What you need to do is find a bee farmer and ask him to get your honey BEFORE the bees have capped it. If they do, it turns into this untreated perfect crystalized form of honey, which is JUST as useable in cooking as regular honey, better for you and AMAZING on your skin. Just apply directly and let dry for half an hour and scrub off with itself... you'll feel a million dollars.

HOWEVER, there is hope! I have tried a many other at home beauty treatment and I have decided to post my favourites, all of which I have had good results with.

#1 Mango Mud Mask - uses only 1/4 a mango, so the rest is yours to eat!

1/4 mango
1 tablespoon oats
1 tablespoon spelt flakes (the original recipe called for 2 tbsp oats but for some reason I only had a tablespoon hanging around and did this instead and it was much richer than normal, but you can just use 2 tablespoons of oats)
2 tablespoons almonds
2 tablespoons whole milk

Blitz in blender. Apply to face. Try not to eat. I swear every time I make this, the area around my lips never gets moisturized. I lick it off.

Oatmeal honey mask: Use crystalized if you can. If not, this works nearly as well.

3 tablespoons oats
2 tablespoons honey

Combine. Apply to face.


Avocado Mask: The fats in this are super good for your skin. Especially if ingested. Just don't go applying your guacamole to your face and eating chips off it that way; it scratches. .... what?

1/2 avocado, mashed
1 egg
1 tablespoon avocado oil (only if you have dry skin)
1 quick squeeze lemon juice (only if you have oily skin)

Combine as above. Apply to face.

And just because this post didn't have enough photos. Here's my breakfast being super naughty.


Saturday, February 6, 2010

Farm-Fresh Friday: Rosemary Jelly


Canning season is still months away - trust me, you'll hear a lot more from me on that front as the fruit starts coming in this summer. But that doesn't mean you can't have loads of fun making jars of prettythings now! I discovered rosemary jelly this year and I absolutely love it.

This goes beautifully on a sandwich with a little cheese, or thinned with a bit of apple juice and brushed over chicken or pork, or in place of mint jelly with lamb. It's sweet, but the rosemary gives it a nice herbal twist that makes it perfect for savory dishes.

ROSEMARY JELLY

1 cup boiling water
3 Tbsp fresh rosemary
2 cups sugar
1/4 cup vinegar
1 pkg liquid pectin
Green food coloring (optional)

Pour the boiling water over the fresh rosemary in a bowl. Cover and let stand for a half hour or so.

Strain the liquid into a pan, add sugar and vinegar, and bring to a rolling boil. Add the pectin, and boil another minute or two, then take off the heat. Add a drop or two of food coloring if you want. Pour into sterilized jars, and process in a boiling water bath for 10 minutes if you want. If not, let the jars cool overnight at room temperature and then store in the fridge once set.


Thursday, February 4, 2010

So-Seedy Nut Bread


I know bread is the big bogeyman right now, but I love it. Wheat is rich in folic acid, fiber, and tons of vitamins and minerals; whole-grain bread has been proven to reduce cholesterol and minimize the risk of heart disease and diabetes. Bread has been "the staff of life" throughout most of human history, and - let's face it - everybody loves to eat it!

The problem is that supermarket "bread" is often just a conglomeration of processed flour, stripped of all its nutrition and taste, mixed with unrecognizable chemicals and preservatives. The last time I bought a loaf of bread, for a culinary emergency when I didn't have time to bake, I didn't use it all and the last few slices sat on the counter for almost a month before I reached for them again. They were still soft. Ew!! Not even the slightest bit stale and no mold! That's not food - if mold spores and microorganisms don't want to eat it, you shouldn't either.

Artisan bakery bread can be found to purchase, but it's expensive. A much better solution is to bake your own. Breadmaking is a great way to work through stress, with all the punching and kneading and shaping. If you have a bread machine, you can let it do the initial mix and kneading, but you should still pull it out to shape and rise in a regular loaf pan; that square loaf you get with a bread machine is unweildy and makes an awkward sandwich.

Here's my favorite bread recipe. It's loaded with seeds and nuts for extra protein, fiber, and heart-healthy good fats. Try it toasted with butter and/or jam, but also try it with meats, cheese, and/or veggies for a big Dagwood sandwich. It'll keep you full for hours and hours, unlike the soft white stuff in the plastic bag. Enjoy!

SO-SEEDY SANDWICH BREAD

1 1/3 c warm (not hot) water or whey
2 Tbsp olive oil
3 Tbsp honey
1 1/2 c whole wheat flour
1 1/3 c unbleached white flour
1/2 c ground flaxmeal
1 tsp salt
1 tsp active yeast
1/4 c sunflower seeds, pumpkin seeds, or a combo
1/4 c chopped hazelnuts or walnuts, divided
2 Tbsp sesame seeds
1 Tbsp milk or soymilk

Bread Machine Method: Pour water, olive oil, and honey into machine. Sprinkle over the flours and flaxmeal to cover the water, add salt to the corner, and make a little well in the center to pour the yeast into. Once you've added the yeast, turn the machine onto the dough cycle and let 'er rip, checking in a few minutes later to make sure it's kneading everything together and not knocking flour balls up against the walls of the machine like mine does sometimes.

When the raisin beep goes off, or when there's only five minutes left in the first knead cycle, pour in all the nuts and seeds EXCEPT for 1 Tbsp hazelnuts.

Without a Bread Machine: Stir the water, olive oil, and honey together until well-mixed, and then carefully stir in the yeast. Let it sit in a warm place until it bubbles up (about 5-10 minutes). Mix the flours, flaxmeal, and salt together in another bowl and add the yeasty water; stir gently with a fork until it just starts to combine together, then start kneading it in. As it takes on a doughy consistency, you might want to transfer it to a countertop or table to keep kneading.

Mix and knead with your hands for 10 or 15 minutes, working it well, then spread it out thin and sprinkle the nuts and seeds on top (except for the reserved 1 Tbsp hazelnuts). Keep kneading until it all comes together evenly, another 5 or 10 minutes, then ball it up and put it in a clean bowl. Cover it with oiled plastic wrap and let it rise half an hour.

Either Way Resume From Here: Take the 1 Tbsp reserved hazelnuts and chop them up very, very finely or run through a small food processor. Set aside for later.

When the dough cycle or that first rise is finished, take out the loaf and punch it down (this means kneading it for a few minutes until it collapses a bit). Put it in a bowl, cover it with oiled plastic wrap, and set it in a warm place for half an hour. Come back and punch it down again, then shape it into a loaf to fit a well-oiled, floured loaf pan. Put it in the pan, cover it with the oiled plastic wrap again, and let it rise another 30 minutes. Preheat the oven to 350 F (175 C).

Brush the top with the milk (you might not need all of it). Make a couple of small slashes in the top with a sharp knife, and sprinkle the finely-chopped hazelnuts over the top. Put it in the oven, and quickly pour a splash of water onto the oven floor; it'll make a big whooshing steam cloud, so shut the oven door quickly to keep all that steam in. This gives the bread a nice crust.

Bake for 30 minutes or until the top looks nice and the bottom sounds hollow when you knock on it. Let it cool on a wire rack before you slice into it and enjoy. Make sure you have friends or at least one loved one at home with you while you bake this bread, because it smells fantastic and you'll want to share a slice of the fresh hot bread with someone who will ooh and ahh all over it with you!


Tuesday, February 2, 2010

Meatless Monday: Eggplant Stew


I'll be honest. I love red meat. LOVE IT. I was a strict vegetarian - no animals whatsoever, not even fish - from age 11 to 23, but when I began eating meat again it was the beef I went for. However, meat is not meant to be the basis of our diet, and most people in Western society eat far too much of it. The excessive consumption of meat has led to such gross outrages as factory farming, heart disease and other health problems, and (perhaps the worst part) low-quality meat.

Far better to only have meat every once in awhile, using it as Thomas Jefferson did, as "a condiment for the vegetables." Enter the Meatless Mondays movement. Aimed at improving the public health, the idea is to encourage people to go vegetarian one day a week. (Besides, if you only eat meat rarely, you can afford better quality meat.)

So here's an old standby from my younger days: Eggplant Stew. You'd be surprised how delicious this is. My ex, a dedicated carnivore, loved this and called to ask for the recipe the day after we broke up. It takes about half an hour to put together, and it goes beautifully on top of baked potatoes, mashed potatoes, rice, or polenta. Fast, cheap, hearty, and delicious - you'll never miss the meat!

EGGPLANT STEW

Olive oil
1 small onion, sliced thin
3 cloves garlic, peeled and minced
1 large eggplant, peeled and diced
1 or 2 carrots, scrubbed and sliced
1/2 cup dry wine (can be red or white)
1 to 2 cups tomato sauce
2 Tbsp balsamic vinegar
Salt & pepper to taste
Rosemary, oregano, and/or basil, to taste
Parmesan cheese (optional, if you want to keep it vegan)

Heat a little olive oil in a large, deep skillet or a wok; add the onion. Saute until the onion softens, then add garlic and eggplant. Continue to saute until the eggplant softens and begins to darken. Add the carrots and keep cooking it up until the carrots soften up a bit and the eggplant is mostly cooked through. Pour in the wine, and stir for a bit so that the eggplant soaks up most of the wine.

Stir in the tomato sauce now. Depending on how big the eggplant was, and how saucy you want this to be, you'll need about a cup or so. You can use spaghetti sauce or pizza sauce for this, but you can also use the plain kind of tomato sauce (note to Australians: I do not mean ketchup!) and just season it with a bit more herbs. In the summer you can use fresh chopped tomatoes - yum!

So stir the sauce in, add a splash of balsamic, and season it up with salt and pepper, rosemary, oregano, basil, what have you. Turn the heat down to a very low simmer, cover, and give it at least five minutes to mingle over the heat. If your potatoes, rice, polenta, or whatever you're serving it over is taking awhile, this can simmer for up to 30 minutes or so. But when the base is ready, spoon the stew on top, and garnish it with Parmesan if you like.


This keeps well, by the way, and tastes great cold. So if there are any leftovers, take them to work for lunch the next day!