


Friday, May 10, 2013
Friday, May 3, 2013
How To Fry An Egg

I knew I could never compete with Smitten Kitten's How to Poach An Egg. I mean, really, who can? It's great! However, I know I can fry an egg, so we'll do that!

First start by cracking your egg. I know this already sounds so complicated! The best way to crack an egg is on a flat surface. Trying to stab it with a bowl or table just invites little shell shards into your beautiful egg. Did you crack it? Did you? Well done!
 | |||
| I put my eggs in a china teacup so I can pretend I'm ballin'. |
Place egg in a cup.

Heat your pan on a medium low heat. The key to eggs is to be gentle, like you're holding a baby. A really really hot baby on a fire.

Swirl about a tablespoon of butter all around the pan.
Theoretically you can use any oil but I prefer butter for the flavour and the fact you can tell when a pan is the perfect temperature by when it's stops bubbling.
 |
| Like this! |

Pour your eggs gently into your pan. Remember, a baby.
 |
| F*ck you, bye! |
For some reason my egg yolk decided to leave my pan without the rest of egg. No worry, we can fix this!

Wait until the white of your egg has cooked slightly and nudge your egg to the edge of the pan.

Flip it slightly so the white is cooked by the edge of the pan and that pesky runaway yolk is trapped.

Let the edge of your pan finish cooking your egg, removing it off the heat after a few seconds.
Serve on a plate and garnish with chopped herbs to make yourself feel super fancy.

 |
| Don't feel bad, he was an asshole. |

Thursday, May 2, 2013
How to Have Interesting Meals when You're Broke, Hungry, Cheap and Lazy
How to Have Interesting Meals when You're Broke, Hungry, Cheap and Lazy
Sometimes you want to save money. Sometimes you're just broke. Whatever you are, you're bored. It's hard to make an interesting lunch or dinner - for one, you have to cook all the time! You just want some food and you want it to get you through the week and you don't want to spend too much effort on it [and if you do, you want it to at least be filling and last the whole week, right?]. It's a shame that can get boring fast.
And that's where I grab your attention with a well placed, "BUT WAIT," and then tell you about my seductive seductive offer. Which is this: A simple guideline on easy flavourful dishes you can easily mix and match to make a myriad of amazing dishes as simply as possible!
Next time you find yourself with 30 seconds or a spare hour, make one of the five major things and a few of the super easy ones and you'll never be bored!
1.
Seed Mixes.
I love these to add crunch and style and versatility to my lunches. The best part is you can make them in batches that last a month at a time and in a variety of flavours in minutes. Here’s a recipe for my three favourites:
I love these to add crunch and style and versatility to my lunches. The best part is you can make them in batches that last a month at a time and in a variety of flavours in minutes. Here’s a recipe for my three favourites:
A.
1 Tablespoon Cumin Seeds
1 Tablespoon Coriander Seeds
1 Tablespoon Sesame Seeds
1 Tablespoon Poppy Seeds
1 Tablespoon Linseeds/Flax Seeds
Notice how they’re all equal parts so you can eyeball this up in seconds
and throw it in a non-greased pan and toast it for about a minute or until the
smell is delicious.
B.
1 Tablespoon Pumpkin Seeds
1 Tablespoon Crushed Hazelnuts
1 Tablespoon Crushed Macadamia Nuts
1 Tablespoon (Do you get the idea?
Do I need to say this anymore? Bueller?) Sesame Seeds.
C.
1 Tablespoon Pumpkin Seeds
3 Tablespoons Crushed Hazelnuts [take THAT, status quo!]
1 tsp cinnamon, freshly ground if possible
1 tsp ginger, same as above
1 tsp nutmeg you get the idea
Toast. Put in a shaker. Enjoy!
This will last up to three weeks in a shaker closed on the counter or in
the fridge. Great to put on top of
salads, through sandwiches, or in various meals to change the flavour entirely!
2. A Giant Batch of Boring
No joke. I’m talking like soaking a big batch of beans
or roasting a simple meat or boiling up a simple lentils, all with nearly no
flavour. Hear me out!
A.
Beans
Soak ‘em if you can [you have the time, face it, you just have a sh*t
memory]. I like to soak some beans
overnight on the weekend, just pour water over them and go to bed. If I forget, handy tip, I pour boiling water
from the kettle over the beans in the morning and let soak at least an
hour. Brilliant. Then, crockpot! [High Four Hours. Low Six
Hours.] Or stovetop if I can remember to
be near the stove ninety minutes later.
I put in the basics, a cut up onion [not even cut well, as I remove it
and put it in the compost at the end], and some herbs from the garden; whatever
I have on hand. Fish them out when the
beans are done and save a cupful of the water ‘cause some recipes call for it,
damnit all.

During the week I turn them into various delights suited to my mood. You can put the beans in a pan with sautéed
onions and with a bit of the water from boiling them and mashing them with a
potato masher until they start frying up, toss in some cumin and coriander
spice and bam, simple and quick refried beans! [Don’t forget the salt!]
Or I put them in a pan with brown sugar, tomatoes, chillies, onions and Worcestershire
sauce [wait here for the recipe I'll be back with it next week!] and I have myself a ten minute BBQ-flavoured fried bean dish, which is
delicious. The options are really
endless depending on your beany mood. Or
if not:
B. Not just a roast, but how about some
shredded meat?

Also, this is another great time to break out the crockpot and forget about
what you’re doing. The best part is if
you screw up, the dried bits of meat taste pretty darn good, too!
Simple Shredded Beef Recipe
3 tablespoons of your favourite frying oil
3kg beef cubes of whatever is the cheapest the butcher has. Serious. Whatever.
That stuff in the back of the freezer with the ice forming will do,
actually.
2 onions
1 capsicum
4 garlic gloves
4 limes
oregano, fresh or dried, about 2 tablespoons
cumin, 3 tablespoons
chili powder, 3 tablespoons
Heat oil in as big as a pan as you can fit onto your stovetop without upsetting
the cat. Brown the beef as darkly as you
can; you’re looking for those crispy seared bits around the edges. Do this in two batches; if you crowd the pan
you’ll steam the meat instead of sear it and you’ll never get the flavour you’re
after no matter what you do.
While this is cooking for a bit, throw the rest of the ingredients in a
food processor and blitz it all up. Or
chop it. Whichever.
Place all meat in pot and add all of the ingredients. Saute about 3
minutes until it starts to look gently cooked.
Add 3 litres of water and boil on a medium heat for one hour.
Strain the broth, reserving a cup or two to moisten the meat later. Shred all the meat with two forks and re-add
the broth.
Then, creativity! Think about it,
you now have a giant batch of meat that will last a decent workweek if you
don’t eat it all and you can do whatever you want to it. I mean, like, whatever you want. Wrap it up with some tomatoes and coriander
[cilantro] in a tortilla. Pour some
salsa over it and mix it up and serve with potatoes. Put with the beans in a baking dish wish a
jar of tomatoes and spices and cover with mashed potatoes before baking –
half-assed Shepherd’s Pie! And still
homemade. Brilliant.
C. But I’m a Vegetarian – Lentils!
What, the beans weren’t good enough?
No, kidding, but you can really only use ‘meat’ once in an article,
right? Lentils are doubley tripley
rainbow pony [and bronie] thing to have on hand because they don’t need
soaking, they taste delicious and they can be served hot or cold. So even if you hate meat and cannot stand the
idea of standing around a bowl of soaking beans [what DO you do all day?] then
this is the pulse for you! [Oh yeah did I mention they're SUPER inexpensive?]
Lentils come in varieties which adds to their awesome. Green, red, brown – it doesn’t end
there. There are literally thousands of
varieties and just skimming the top is good enough – they all basically act the
same in cooking with their slight flavour and texture differences, but for a
beginner, who cares? Get the one that
you like or the one you want to try most.
Basic Lentils
Look over the lentils for any tiny pebbles, sometimes they don’t get
sorted properly in the packing. Cover
with cold water and bring to a simmer. Place herbs from the garden or whatever is
your favourite [mine is rosemary, thyme, a bay leaf and oregano] in either a
bag or tied with a string into the pot along with a touch of salt and pepper. Cover with a lid and simmer until soft,
anywhere from 20 until 45 minutes, so check every few minutes and give it a
stir.
From here you can drain and have lentils to toss into salads, with meats
or to puree and make into a soup [with just a bit of butter]. You can let it chill and mash it with onions
and breadcrumbs and turn it into patties to fry into vegetarian burgers.
You
can even mix it with the beans above, some of the seeds and some chopped
veggies and make an awesome salad. See
what I did there?
3.
With a
Side of Something Tasty
Sauces are delicious and they change the
flavour of whatever you put them on, which makes your big batch of boring a whole lot more interesting.
A. A Sauce/Dressing Made Of Spicy
A pile of chillies [all kinds, whatever you have that’s as spicy as you
can handle], put on the stove-top [in a pan or direct on the flame, I don’t
judge] until black and peelable and squishy on the inside. Peel if you don’t like burnt chilli
flavour. Don’t peel if you freakin love
it like I do. Why do people peel this
stuff? It’s like pepper fire. OMG.
Throw into a blender with a pinch of salt, a squeeze of lime and soft
leafy herbs if you have any [coriander/cilantro, parsley [not curly], oregano
and basil are all good choices, just remember to remove the stalk from the
oregano. I’m speaking more to myself
here.]
B. A Sauce/Dressing Made of Creamy [And
Cheesy]
I love this recipe for extended the shelf life of my cheese and turning it into a tasty sauce!
I love this recipe for extended the shelf life of my cheese and turning it into a tasty sauce!
Equal parts soft crumbly cheese [like feta or bleu] and buttermilk. Tons of cracked pepper and a pinch of salt.
That’s it.
Too fatty? I don’t care. It also works with yogurt and milk. Combine until the consistency you prefer and
salt and fresh cracked pepper until it’s so good you marry it. If you throw chopped herbs in this [or
olives…or preserved lemon…] you basically get a Ranch-style dressing only
not. You’ll love it.
C. A Sauce Made of Peanut Butter
1 small onion
A handful of chillies or peppers, as wanted, chopped finely
1 c. peanut butter [I prefer crunchy organic but that’s because I am one]
2 tablespoons tamarind paste [can be replaced with the same amount of
fish sauce or all purpose sauce. The
flavour won’t quite be the same but it has the same effect you’re going for],
soaked in two tablespoons of water
1 tablespoon soy sauce
1 tablespoon oyster sauce [no worries veggoes it comes in vegan
flavoured!]
1 tablespoon sesame oil [or a big ol’ handful of sesame seeds if you’re
watching your fat you weird peanut butter sesame eating fat hater]
Gently sauté onion on a low heat with peppers until soft and just turning
brown and caramel on the edges. The
longer you can do it without burning, the better. Make a game of it! Don’t sue me. Add the peanut butter and cook gently just to
give the peanuts a nice roasted flavour.
Add liquids and combine. If too
thick, add some water or vegetable stock.
Cook for a few minutes, taste and adjust flavours to suit.
4. Roasted Vegetables.
No really, that’s it. No long list.
No copious amounts of text. Roast
some vegetables. The temperature you’re looking for is 180c/350f. The time you’re looking for is
nonexistant.
Let’s
be real, it really depends on how lazy you were when you chopped the
veggies. This is where you pay for your
sins; in oven time.
Throw
your favourite vegetables, chopped to the sizes you prefer, with a few
tablespoons of oil and a pinch or two of your favourite salt. I also like to add thyme and rosemary to mine
but that’s because if I don’t, I grow rosemary triffids and they eat my cat.
Check
your veggies every ten to twenty minutes, shaking the pan so all sides can get
some caramelized pan goodness. Bring out
when it looks delicious and smells like you want to eat it.
If
you’ve felt the desire to make a simple sauce above you’re in the clear for
some tasty healthy side dishes. Now you
can… you’re just dipping the vegetables in the buttermilk cheese sauce, aren’t
you?
Some
vegetable ideas: Beetroot, carrot,
sunchoke/Jerusalem artichoke, brussel sprouts, cabbage, cauliflower, corn,
kohlrabi, celery, capsicum/peppers/chillies, triffids
5. The
Pick-ables
Pick-ables
are like a mezze platter; you can eat them with your fingers and pretend you’re
classy when you’re not by calling it something Greek, only not called something Greek. And let’s be honest, I don’t do classy. This is the stuff you’re gonna pick at because
it’s tasty and you can call it what you want but I’m going to have most of it
gone by lunchtime if I can help it.
A. Pickles
See pickles aren’t just
cucumbers in a jar of vinegar – they can be a multitude of delicious things you
weren’t even aware were delicious things.
Relish is a pickle. Olives are a pickle. Chow Chow is a pickle [and the
Southerners of America know that!]. You
can even put some of your delicious roast peppers from making that sauce up
there and toss it in a light pickle and serve that by itself in your lunch in a
small jar. You can make your own or you
can buy them – whatever you’re eating better than you were yesterday, am I
right? Also, olive lovers, this is your
excuse. TAKE IT BEFORE YOUR WALLET HATES YOU.
As for pickle recipes, I will be posting quite a few in the coming
weeks, so keep an eye out. They’re great
with lunches and you can make large enough batches to last a year if you want!
Simple Light Pickle for Lunches
3c vinegar
2c water
2 tablespoons salt
1 tablespoon honey
Put all ingredients in pan and
boil. Add spices like mustard, cloves,
cumin seed or dill seed if you wish.
Pour hot liquids over prepared vegetables. I’ll explain how to can this in the future so
just allow to cool, pour into jars and keep refrigerated for this week and eat
this for the week and we can work on canning next week!
Suggested Vegetables: Cucumber,
Beetroot [chopped into small cubes if you intend on eating within a few days,
otherwise they take some time], corn, cauliflower, chillies, beans, cherries,
garlic, onions, eggs.
You can save veggies that are about to go soft this way. They will be delicious as a pickle. Trust me!
You can save veggies that are about to go soft this way. They will be delicious as a pickle. Trust me!
B. Because
fruit.
We all love fruit. Except for those of us that don’t. None of us trust those people. Anyway, one piece of fruit is kinda boring and who wants that? Not you or you wouldn’t be here going, “WTF kind of advice is ‘grab a piece of fruit for lunch? Thank you Captain Obvious!” Right? Not to mention fruit can be kinda expensive these days and it happens to go off a little quick.
We all love fruit. Except for those of us that don’t. None of us trust those people. Anyway, one piece of fruit is kinda boring and who wants that? Not you or you wouldn’t be here going, “WTF kind of advice is ‘grab a piece of fruit for lunch? Thank you Captain Obvious!” Right? Not to mention fruit can be kinda expensive these days and it happens to go off a little quick.
I’ll be doing a more in depth
post on this next week, but I’ll give you the basics of a super simple honey
syrup you can use to keep your fruit fresher a little longer and mix it up a
bit.
1c honey
2 1/2c water
[Optional: Cinnamon, cloves,
nutmeg, lavender buds, marigold petals, imagination]
Boil until honey is
dissolved. Boil a further ten minutes
until syrupy. Add spices before boiling
and gentle petals or flowers after. Pour
this hot mixture over any prepared fruit you want. It’ll turn it into a homemade fruit cup only
in a more bee-like syrup. Grapes,
strawberries, watermelon [a great way to get small pieces of watermelon into a
lunch bag], kiwi, apple, cherries, and
pear; you can use as many or as few as you want. I go overboard and buy a ton of fruit on sale
in summer and chop them all and freeze.
Then I pour syrup on the thawed ones for spooning onto yogurt and
topping with rolled oats for a side dish for lunch.
You could even replace a cup of
water with a cup of champagne. Imagine
it.
“Hey You, Behind the Computer
There, what’s that you’re eating for lunch?”
“Oh. This? Well it’s my champagne lavender mango and
pear honey with greek yogurt and muesli.” And to further up the ante, add some
activated almonds. BAM. You win at lunch.
Not a bloody peach, is it?
C. Because
cheese.
A cheesy dressing recipe isn’t
enough. It isn’t. You know it, I know it. We all know it. One cheese does not a lunch make.
I’ll be doing an article in the
future on how to make your own soft cheeses like cream cheese and feta and
mixing them up with flavours to make them delicious but for now let’s just say
you can get cream cheese and feta and mix them up with flavours to make them
delicious! Get a small container so you
don’t go overboard [I know] and chop in your favourite herbs as a side to go
with your roasted veggies or some crackers.
If you get two or three hard
cheeses and make nice thick slices and keep them wrapped up you can take them
with you and serve them with the relishes and pickles and fruit, making
basically a bread and meatless ploughman’s lunch. Add bread and meat if it becomes suitable.
These foods, along
with many others, make lunches not only ridiculously easy to throw together but
they are also economical and interesting from day to day. Most of these, such as the cheeses, sauces,
fruits and pickles can last up to three weeks in the fridge, being picked at
daily and topped up whenever you have extra vegetables or fruit lying
around. This isn’t even counting grains,
if you eat them!
Combining them is
as easy as deciding what you’re in the mood for that morning or the night
before:
1.
Spicy
Shredded Beef [Spicy Sauce and Beef] with roasted vegetables and a peanut sauce
topped with delicious toasted seeds and some cheese and pickles on the side to
nibble on.
2.
Peanut
chicken with vegetables in a wrap [okay so the wrap isn’t included in this
tutorial] with a salad made from fresh veggies, tossed toasted seeds and some
fresh cheese.
3.
Veggies
and Beans with shredded cheese and relish and a champagne fruit yogurt cup with
oats.
4.
Cheese
dressing topped vegetables on lentils with relish and more cheese because you
love your arteries today.
5.
Shredded
beef. Olives. Pickled eggs. Relish. Honeyed Fruit. Big hunk of bread.
6.
Pickled
vegetables and shredded chicken [recipe coming soon, don’t worry] in a wrap
with a cheese dressing AND a spicy dressing. Fruit and cream cheese on the
side.
7.
Fruit
and yogurt with cinnamon seeds and oats.
Peanut vegetables in a wrap with a delicious crisp dill pickle.
8.
Lentil
soup with blue cheese and toasted seeds with some bread and cheese
9.
Black
bean and pickled corn salad with roasted veggies and all of the seeds.
….and keep going!
Wednesday, March 13, 2013
Honey and Rosemary Pickled Spring Onions
When I moved here, I was warned the owner of the property really liked onions. What I didn't seem to understand was how much this translated to random onion patches all over the property. Here is some either spring onions or baby leeks, I can't quite tell. Luckily my pickling recipe works for both!
1c honey
1c vinegar
1/2c water
1 tablespoon flaked salt
1 tablespoon black peppercorns
6 teeth garlic, peeled (rawwwwr)
1 lime, juiced (zested if you want tangy)
1 long sprig rosemary
1 big handful spring onions (this bunch was perfect for this amount).
Put all ingredient minus onions and rosemary in a non reactive pan. Some pans, like copper, can leech, well, copper into your preserves which not only make them toxic but makes them taste terrible! A good stainless steel pan with a heavy base solves this problem. Let simmer gently for ten minutes.
Heat rosemary in empty pan gently, until the room is fragrant with the smell of rosemary. Add to jars.
Meanwhile measure onions against your jars and trim about half an inch below the top. Some will be uneven but it won't matter. Stuff as many into each jar in one go (if you like it neat) as you can. If it goes over the top, press it down gently. It'll go down more later.
Allow liquid to cool slightly but allow to be still a little hot. Pour into jars slowly and wait for liquid to soak up, about 2 minutes. Tap jars down and fill again, pressing onions down again. This time they should bend easily and be softening nicely from the heat. Top off and seal, refrigerating immediately.
They're excellent after even a day but taste REALLY awesome after a week. I like to put them even on store bought pizza, who cares?! Eat out of the jar! Put in sour cream to make a delicious dip! Eat the heck out of it.
The photo of the jars is right side up in edit but sideways on blogger - what do you see?!

Monday, March 4, 2013
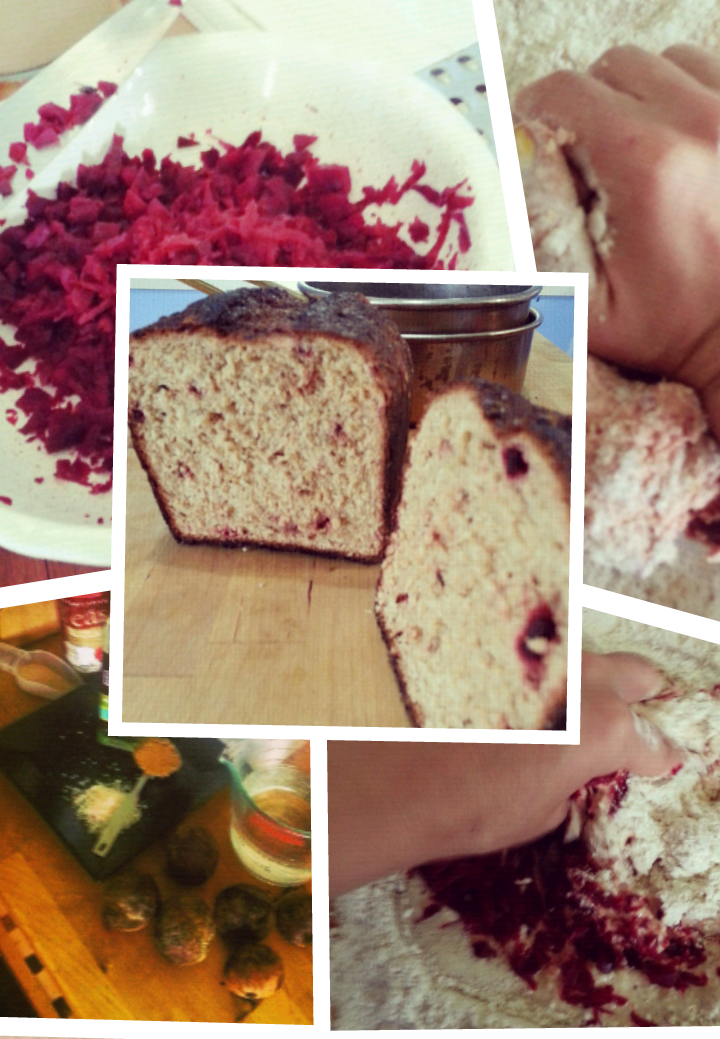
Chunky Breakfast Beetroot Loaf Bread
I've been moving and it's been hard on my poor vegetables! After the move I found some horrible wilted beetroot (beets for you Americans) looking sad in the back of the pantry. This is a good recipe for that. Simply steam the old sad beetroot until soft and trim all the wrinkly bits off. If you have chickens you can be quite vicious with what you take away. Shred it all until you have about a cup of beetroot. Since the end of a beetroot can't be sliced by my mandolin, I made chunks with the last bits with my knife. That way I got no waste. Otherwise if you don't want chunks, simply just use the shredded beetroot!
Combine 3/4c water and 7g or two and a quarter teaspoons dry yeast with one tablespoon sugar. This will help you figure if your yeast is any good. Do this before you chop your beetroot and by the time you're done it should be foaming.
Throw four cups of flour onto a work surface (if you have problems cleaning up a paint scraper from a hardware store is a wonderful thing) and make a well in the centre that has high sides.
Put the beetroot in the well with a good handful of salt, about 10g or two tablespoons of coarse kosher or river salt (I use pink river). Becuase bread is so light and has so much flavourless flour, it needs more salt than you think. This, however, will nearly always be less salt than a traditional purchased loaf contains.
Also add two tablespoons of oil.
Pour the foam water slowly as you stir with your fingers of the other hand. Push up the sides to make sure the water doesn't spill over the edge. If you work your way outwords, your loaf will not pick up more flour than it needs. If your beetroot is extra wet, you might need up to another cup. It should be slightly sticky so if it is just keep kneading. Eventually the texture of the dough will seem stretched, dull and springy. When it suddenly transforms into what looks and smells exactly like what you think it should (the bakery smell will start filling your house already!) you are done. It should take about ten minutes. If you have problems kneading, stand on a step stool or chair - the weight from above is more important the actual hand motions.
Put in oiled bowl and raise 45 minutes. Punch the double inflated dough (if it's not double, wait a little longer) down into the bowl and make a new ball of dough and let sit until doubled again.
Turn on the oven to as high as it goes. Prepare a glass of water. If you have a gas oven, put a lipped sheet pan on the base of your oven.
Punch down and form loaf. I like my loaf tins so I use those.
This is where you can choose your decor. Do you like the basic simplicity of a flour lined crust? Do you prefer a shiny flaky crust? A crisper crust is made by oiling the pan before putting your loaf in and then using an egg wash (bit of egg and water) over the top. A more rustic loaf can be made by putting flour down on the pan (a tiny amount of oil brushed up the sides first) and the top floured.
Let raise until double. When it's half rises, cut a big slice into the top. I like to do it early because I love the appearance of it. Otherwise do it later and you'll get those nice thin lines. Should be another half hour to rise.
Yes, three rises. This will nearly always guarantee a fluffy loaf if you knead properly and have a hot oven. Trust me and you will ALWAYS take that extra step because thw guarantee is WORTH it. Nothing worse than all that work and flour just to have a sad flat loaf.
Put the loaf in the oven and toss the water into the bottom. Make sure not to hit the pilot light or flame if you're on gas!
Immediately turn down to 180°c or 350°F. Let cook five minutes less than I did. See how I burnt the edges? Don't do that. I just moved!! This is proof though that oven times can differ depending on your oven. After half an hour, check on it and see if its nice and golden on the outside and springy to the touch (touch quickly!). You won't know 100% by eye until you're used to bread but otherwise when it appears as done as you want it (30-45) flip it upside down and flick it. If it sounds nice and hollow, you have bread!
Thursday, August 23, 2012
A New Post and A Rant About Meat
It's been quite a long year since I posted last! The farm has been a lot of work and we've had to move once more, leaving our precious tomato crop behind to whither and die at the place that no longer wanted us. We're staying at a new place now, a place that looks more permanent, at least in the sense the new renters absolutely adore us. The neighbours here are, as usual, quite horrible, but I have many plans to win them over with cupcakes and biscuits.
Currently we are on three cleared acres, just a small little plot, as we save up, finally, for our new home. I've been working off and on as a chef for small jobs here and there while writing my cookbook and making money various other ways. My husband has quit his job and opened his own at-home and mobile business repairing trailers, tractors, pretty much anything metal and huge that needs welders and hands. Just yesterday with his spare time and money, he has built me a gorgeous steel pen for my beautiful golden pheasants.
We have two nanny goats, Nanny and Jealousy and a billy who does not belong to us named Diego. Nanny is a year older than Jealousy and has kidded before so she seems much more comfortable with her fattening belly than Jealousy, who's on the last legs of her first pregnancy - if she can get on her legs at all.
The abattoir agreed to kill and dress my goats for me for $30, which seems fair. We recently spent $75 on a whole dressed goat we cut up into bits on a fun learning day to get into our freezer. It seems almost sad that I only save forty or so dollars by knocking my own goats up and having them killed for me. That's a savings of less than $5 a month! Goats themselves are $80 a piece, living. Not really a marketable venture. At least we only borrowed Diego so we didn't have to pay for him - he got to knock up our goats and gets a good feed in the meantime, until the old owners need him back for their next mating season.
My biggest excitement right now is the milk that will be coming in. I am looking forward to all sorts of lovely things. I have collected a few cultures and was heavily depressed to find my vegetarian rennant had spilled all over the fridge. It's only a few dollars but when you're only saving $5 a month on goat meat, you do what you can. The dairy is what'll put me back in the black, I believe. I will be posting recipes for goat's milk mozzarella, goat's milk ice cream, goat's milk yogurt, all of it. There will even be video of me attempting to milk a goat for the first time. Yes, the first time - because I need to really mess up on camera to show people how even a silly little thing like me can make this work. If I can, anyone can!
Quite a few of our chickens have decided to eat eggs and some had to be culled. There's still more that need to their heads removed, but I'll get to those as I can. They were quite violent with it, so it was obvious they weren't going to 'get over it'. Either way, I was able to make a roast, some stock, a ton of dog food AND save $6 a week on their food/egg losses.
When killing your chickens saves you $20 a piece immediately... you do it. It doesn't even become a moral vs. heart thing anymore after awhile. It just simply is. This is the way it works to make the farm work otherwise the farm doesn't work. I've lost hundreds of dollars in eggs over the last few months. I've fed chickens who were hurting the final product. It just works like that, sadly. I don't feel good killing them.
I see chicken trucks pass through my small town daily. The chickens in them are missing feathers, can barely stand (if at all), have pale combs and beaks and just overly look miserable, disgusting and on the verge of disease. My chickens, while not as fat and meaty as their factory counterparts, are full of yellowy fat, combs bright red and large, eyes shiny, feet scales thick and strong, and their nails long. They are healthy.
I know I hardly ever eat chicken now; chicken breast is one of the worst things I can eat in my opinion. The breast, the nicest bit, to be eaten and throw the rest away. Why this waste? Why do it? I keep the bones for stock, gorgeous beautiful golden stock that flavours almost every dish I make incredibly, it's gelatinous texture thick from the quality of the bones I used. I keep the liver for a classic pate and the heart just to fry and eat. I can never cleanly remove the lungs so I just leave them in the bird to flavour my roast. The legs and wings are delicious and so is the meat stuck to the back. Lungs and stomach (minus bile duct) go into dog food. Nobody eats the feet, I keep trying. So I find it hard, incredibly hard, after killing my own chickens, to eat breast meat or any chicken in public, really. I see the life I had to let out in order to get a breast or two. And when I see us throw the rest of the carcass, the beautiful meat and extras, just to have the best pieces, I find it wasteful and horrible.
In order to eat a chicken every other week, which would last me about 3 days of meals (we are a small family) I would have to kill 25 chickens a year. Just to have two breasts every other week! A chicken breast a week is 25 chickens. A week! I know people who cannot manage a day without chicken. And do you think they're all coming from the same chicken? Guaranteed you've probably not eaten the same two breasts off the same chicken if you've bought it somewhere commercially. When you really sit down and think of the damage, it crushes you a little. Especially when you only have thirty or so chickens at all - I would have to cull nearly my entire flock to each chicken once in awhile for a year!
So meat is a treat, I suppose. We only get it two or three times a week. Usually in the form of goat or beef, since we still have a cattle farm up north run by Glynn's parents. Glynn has also started some tanks up for fish farming, which he wants to do on a small scale for our family for now. The bees are also coming in soon. Chicken is a rare treat because of the life to meat value it has on a farm. Beef brings in quite a lot of meat and goat a fair amount. I would say a whole goat is enough for a family of a four to eat meat twice a week for 6-8 weeks, if they were very hungry and liked making lots of sandwiches from the leftovers. A half cow should last 6 months with extreme carnivore mode set.
I AM SO SICK OF STEAK. Okay, let me tell you super-marketers something - steak is the BIGGEST thing on a cow. Not as in, it's worth a lot, as in, it's what a cow has the MOST of, other than being a cow. Depending on weight and thickness, you can get something ridiculous like 100-150 steaks. Maybe more! I never get to the cow on the farm before it's half eaten anyway so some steaks might be gone already! Minced beef is utterly useless if you're not into an American diet and all the cool stuff like heart, liver, oxtail there's only ONE of on each cow, so that becomes the real treat. How funny, right?! When you farm, steak is quite possibly the most obnoxious overdone incredibly boring meat you can have. What do you do with steak other than make steak? Slice it and make steak sandwiches? So naturally, one off items become massive treats. Big bags of fat are exciting because they end up being my drippings for my meat pie crusts. Liver is exciting because they're so much of it and it's so finicky to cook it becomes a fun little challenge. (Note: I currently have one sliced liver taking up FIVE take away containers in my freezer). Heart tastes amazing cubed into a stew with chuck STEAK. (I have gone so far as to throw T-Bone & Rib Fillet into a crockpot because *bleep* STEAK!)
So now when I go to the butcher, I beg for oxtail and heart and bones. Oh, do you have tripe!? I would so love a bit of tripe! These are the one-off things you can only get as a treat when you raise them yourself, not a disgusting off-cut you want nothing to do with. Steak, however, becomes so incredibly constant that, here, have a steak. TAKE MY STEAK. TAKE IT. I still have steak in the freezer from Christmas (not the holiday, the steer)... a new cow is coming into the freezer soon along with half a pig I got from a free range farmer and I still can't bring myself to eat another steak.
I'm sure all of you just feel terrible for me.
Monday, November 14, 2011
Tomatoes and Strawberry Jam!
Hello Everyone!

This month has been super jam-packed busy! So busy in fact I had to take time off from real world working just to keep up with what's going on at home! And speaking of jam-packed, I even packed jam. Not just the mango rosemary jam I promised and never delivered but good ol' fashioned strawberry jam. I tested two recipes and came back with the one I liked the most! Oddly enough, that was not the country 'use lemons' recipe that you slow cook. The more delicious, thicker, pinker lovelier batch came from the back of the Jamsetta packet. Go figure! (If anybody can tell me where to get local pectin, please post!)
This is the CWA strawberry preserves. It was dark and honied almost, which was quite nice but didn't taste near as fresh as the regular pectin recipe, even though they were the same batch of strawberries. This also had a higher propensity to want to burn, one because it took 40 minutes to boil and two because you weren't allowed to stir it. Also, you used less lemons and got more preserves out of the packet jam. Ouch! If I had a lemon tree, I would totally do the CWA recipe way more and be a bit more careful about eyeing it perfectly to get it just right, but until I can afford 10 lemons a batch, I might stick to the packet. How unfortunate for me!
For quick jam:
3kg strawberries
1/2c water
8 tablespoons lemon juice (about two lemons)
2 50g packets Jamsetta
3kg sugar
3 tablespoons butter (optional)
Before starting, place some plates in the freezer.

Rinse and hull strawberries. Hulling means just to cut the tops off real quick with a knife. Feed tops to the chickens or compost for lovely vitamin-C rich soil (great for watering citrus!).
Place everything minus Jamsetta and sugar and put into a preserving pan.

Or, like I do *above* use a nice good baking tray on a long burner (or two burners) of your stove. Basically, you want as large a surface as possible to prevent clogage, difficult stirring and, oh, burning the whole darn thing. Cook until fruit is soft, about 10 minutes. Maybe 20. Depends on the size of your strawberries and how berry-y you want the jam. I chose really super soft, 20 minutes.
Add Jamsetta, sugar and butter, if using (it keeps the scum from forming). Bring to a boil for 10 minutes, removing any scum with a spoon. It should look like above.
Test by placing drop or three of jam onto frozen plate and waiting ten seconds. If it wrinkles and appears jam-like when poked questioningly with the tip of a finger, it's done.
Either wait to cool and store in jars with a wax ring on top or put hot into sterilized jars and boil can 10 minutes, depending on your preferred method.
 Also, my husband and I built a giant tomato patch over the weekend! For the last month, we've had tomatoes growing in a seedling bed and finally, they were getting too crowded for comfort. I filled the bed, but right before I did I snapped a photo of it! I know it looks so empty without seedlings right now but I assure you it's filled with 400 tomatoes, 5 varieties at the moment. All heirloom.
I'll be writing about how to grow nice tomatoes in the near future!!
Happy Cooking!

This month has been super jam-packed busy! So busy in fact I had to take time off from real world working just to keep up with what's going on at home! And speaking of jam-packed, I even packed jam. Not just the mango rosemary jam I promised and never delivered but good ol' fashioned strawberry jam. I tested two recipes and came back with the one I liked the most! Oddly enough, that was not the country 'use lemons' recipe that you slow cook. The more delicious, thicker, pinker lovelier batch came from the back of the Jamsetta packet. Go figure! (If anybody can tell me where to get local pectin, please post!)
 |
| Dark red strawerry preserves, yum! |
For quick jam:
3kg strawberries
1/2c water
8 tablespoons lemon juice (about two lemons)
2 50g packets Jamsetta
3kg sugar
3 tablespoons butter (optional)
Before starting, place some plates in the freezer.

Place everything minus Jamsetta and sugar and put into a preserving pan.

Or, like I do *above* use a nice good baking tray on a long burner (or two burners) of your stove. Basically, you want as large a surface as possible to prevent clogage, difficult stirring and, oh, burning the whole darn thing. Cook until fruit is soft, about 10 minutes. Maybe 20. Depends on the size of your strawberries and how berry-y you want the jam. I chose really super soft, 20 minutes.
Add Jamsetta, sugar and butter, if using (it keeps the scum from forming). Bring to a boil for 10 minutes, removing any scum with a spoon. It should look like above.
Test by placing drop or three of jam onto frozen plate and waiting ten seconds. If it wrinkles and appears jam-like when poked questioningly with the tip of a finger, it's done.
Either wait to cool and store in jars with a wax ring on top or put hot into sterilized jars and boil can 10 minutes, depending on your preferred method.
 Also, my husband and I built a giant tomato patch over the weekend! For the last month, we've had tomatoes growing in a seedling bed and finally, they were getting too crowded for comfort. I filled the bed, but right before I did I snapped a photo of it! I know it looks so empty without seedlings right now but I assure you it's filled with 400 tomatoes, 5 varieties at the moment. All heirloom.
I'll be writing about how to grow nice tomatoes in the near future!!
Happy Cooking!
Subscribe to:
Posts (Atom)
